


SpringBoot+Vue前后端分离项目练习文档
说明
本文档负责记载开发SpringBoot+Vue开发的后台管理项目练习
由于自身的实践能力太差,没有开发经验,故准备实践学习手搓开发一个前后端分离项目
学习及参考视频带你从0搭建一个Springboot+vue前后端分离项目,真的很简单!
感谢程序员青戈!
学习资料及源码地址:
当然我们还是需要明白SpringBoot与Vue的简单原理及简单使用方法
同时我们列出一些技术栈以供各位查漏补缺
- MyBatis-Plus MyBatis JDBC MySQL
- 最基础的IDE使用 IDEA,WebStore,Navicat,VSCode
- NodeJS的基础命令及知识 Powershell shell
- 了解Vue框架的一些基础架构及项目结构 H5,CSS,JS VueRouter,axios
- 了解SpringBoot框架的基础知识,基础架构,基本调用及底层方法 Javaweb JavaSE Maven
- 了解ElementUI框架的基本调用和使用
- 懂得使用Debug,浏览器F12,Postman 进行接口,方法,页面的调试及排错
- 有耐心查看文档
- 懂得查看源码
开干就完了!!
准备开发环境及创建工程
- 安装NodeJS
- 下载Vue客户端环境
npm/cnpm install -g @vue/cli #cnpm需要下载cnpm
- 创建Vue项目
vue create springboot-vue_demo

#选择Vue的配置
Manually select features

#选择VueX;VueRouter;Babel。取消选择Linter/Formatter
#选择Vue版本为2.x

#试运行VueDemo
cd springboot-vue_demo
npm run serve
IDEA小技巧
- Shift + F6 快速重新命名
- Control + Shift + r 快速重新命名或替换
- Control + r 快速查找并替换
开发过程
SQL数据表
User表
CREATE TABLE `user` (
  `id` int NOT NULL AUTO_INCREMENT COMMENT 'ID',
  `username` varchar(255) COLLATE utf8mb4_unicode_ci DEFAULT NULL COMMENT '用户名',
  `password` varchar(255) COLLATE utf8mb4_unicode_ci DEFAULT NULL COMMENT '密码',
  `nick_name` varchar(255) COLLATE utf8mb4_unicode_ci DEFAULT NULL COMMENT '昵称',
  `age` int DEFAULT NULL COMMENT '年龄',
  `sex` varchar(255) COLLATE utf8mb4_unicode_ci DEFAULT NULL COMMENT '性别',
  `address` varchar(255) COLLATE utf8mb4_unicode_ci DEFAULT NULL COMMENT '地址',
  `role` int DEFAULT NULL COMMENT '角色:1:管理员 2:普通用户',
  `avatar` varchar(255) COLLATE utf8mb4_unicode_ci DEFAULT NULL COMMENT '头像',
  PRIMARY KEY (`id`)
) ENGINE=InnoDB AUTO_INCREMENT=23 DEFAULT CHARSET=utf8mb4 COLLATE=utf8mb4_unicode_ci COMMENT='用户信息表';
Book表
CREATE TABLE `book` (
  `id` int NOT NULL AUTO_INCREMENT COMMENT 'ID',
  `name` varchar(255) CHARACTER SET utf8mb4 COLLATE utf8mb4_unicode_ci DEFAULT NULL COMMENT '名称',
  `price` decimal(10,2) DEFAULT NULL COMMENT '价格',
  `author` varchar(255) CHARACTER SET utf8mb4 COLLATE utf8mb4_unicode_ci DEFAULT NULL COMMENT '作者',
  `create_time` datetime DEFAULT NULL COMMENT '出版日期',
  `cover` varchar(255) COLLATE utf8mb4_unicode_ci DEFAULT NULL COMMENT '封面地址',
  `user_id` int DEFAULT NULL COMMENT '用户ID',
  PRIMARY KEY (`id`)
) ENGINE=InnoDB AUTO_INCREMENT=5 DEFAULT CHARSET=utf8mb4 COLLATE=utf8mb4_unicode_ci;
News表
CREATE TABLE `news` (
  `id` int NOT NULL AUTO_INCREMENT COMMENT 'ID',
  `title` varchar(255) COLLATE utf8mb4_unicode_ci DEFAULT NULL COMMENT '标题',
  `content` text COLLATE utf8mb4_unicode_ci COMMENT '内容',
  `author` varchar(255) COLLATE utf8mb4_unicode_ci DEFAULT NULL COMMENT '作者',
  `time` datetime DEFAULT NULL COMMENT '发布时间',
  PRIMARY KEY (`id`)
) ENGINE=InnoDB DEFAULT CHARSET=utf8mb4 COLLATE=utf8mb4_unicode_ci;
category表
DROP TABLE IF EXISTS `category`;
CREATE TABLE `category`  (
  `id` int(11) NOT NULL AUTO_INCREMENT COMMENT 'id',
  `name` varchar(255) CHARACTER SET utf8mb4 COLLATE utf8mb4_unicode_ci NULL DEFAULT NULL COMMENT '名称',
  `pid` int(11) NULL DEFAULT NULL COMMENT '父节点id',
  PRIMARY KEY (`id`) USING BTREE
) ENGINE = InnoDB AUTO_INCREMENT = 8 CHARACTER SET = utf8mb4 COLLATE = utf8mb4_unicode_ci ROW_FORMAT = Dynamic;

----------------------------------------------------------------------------------------

INSERT INTO `category` VALUES (1, '文学', NULL);
INSERT INTO `category` VALUES (2, '童书', 1);
INSERT INTO `category` VALUES (3, '社会科学', 1);
INSERT INTO `category` VALUES (4, '经济学', 1);
INSERT INTO `category` VALUES (5, '科普百科', 2);
INSERT INTO `category` VALUES (7, '法律', 3);
message表
DROP TABLE IF EXISTS `message`;
CREATE TABLE `message`  (
  `id` bigint(20) NOT NULL AUTO_INCREMENT COMMENT 'ID',
  `content` text CHARACTER SET utf8mb4 COLLATE utf8mb4_general_ci NULL COMMENT '内容',
  `username` varchar(255) CHARACTER SET utf8mb4 COLLATE utf8mb4_unicode_ci NULL DEFAULT NULL COMMENT '评论人',
  `time` varchar(255) CHARACTER SET utf8mb4 COLLATE utf8mb4_general_ci NULL DEFAULT NULL COMMENT '评论时间',
  `parent_id` bigint(20) NULL DEFAULT NULL COMMENT '父ID',
  `foreign_id` bigint(20) NULL DEFAULT 0 COMMENT '关联id',
  PRIMARY KEY (`id`) USING BTREE
) ENGINE = InnoDB AUTO_INCREMENT = 28 CHARACTER SET = utf8mb4 COLLATE = utf8mb4_unicode_ci COMMENT = '留言表' ROW_FORMAT = DYNAMIC;
area表
DROP TABLE IF EXISTS `area`;
CREATE TABLE `area`  (
  `id` int(11) NOT NULL AUTO_INCREMENT,
  `label` varchar(255) CHARACTER SET utf8mb4 COLLATE utf8mb4_unicode_ci NULL DEFAULT NULL,
  `pid` int(11) NULL DEFAULT NULL,
  `value` varchar(255) CHARACTER SET utf8mb4 COLLATE utf8mb4_unicode_ci NULL DEFAULT NULL,
  PRIMARY KEY (`id`) USING BTREE
) ENGINE = InnoDB AUTO_INCREMENT = 4 CHARACTER SET = utf8mb4 COLLATE = utf8mb4_unicode_ci ROW_FORMAT = Dynamic;

-- ----------------------------
-- Records of area
-- ----------------------------
INSERT INTO `area` VALUES (1, '地球', NULL, 'Earth');
INSERT INTO `area` VALUES (2, '中国', 1, 'China');
INSERT INTO `area` VALUES (3, '韭菜', 2, 'JC');
permission表(RBAC权限模型)
DROP TABLE IF EXISTS `permission`;
CREATE TABLE `permission`  (
  `id` int(11) NOT NULL AUTO_INCREMENT COMMENT 'id',
  `name` varchar(50) CHARACTER SET utf8mb4 COLLATE utf8mb4_unicode_ci NULL DEFAULT NULL COMMENT '名称',
  `path` varchar(50) CHARACTER SET utf8mb4 COLLATE utf8mb4_unicode_ci NULL DEFAULT NULL COMMENT '资源路径',
  `comment` varchar(255) CHARACTER SET utf8mb4 COLLATE utf8mb4_unicode_ci NULL DEFAULT NULL COMMENT '备注',
  `icon` varchar(20) CHARACTER SET utf8mb4 COLLATE utf8mb4_unicode_ci NULL DEFAULT NULL COMMENT '图标',
  PRIMARY KEY (`id`) USING BTREE
) ENGINE = InnoDB AUTO_INCREMENT = 15 CHARACTER SET = utf8mb4 COLLATE = utf8mb4_unicode_ci ROW_FORMAT = Dynamic;
-- ----------------------------
-- Records of permission
-- ----------------------------
INSERT INTO `permission` VALUES (1, 'Home', '/home', '主页', 'el-icon-house');
INSERT INTO `permission` VALUES (2, 'Book', '/book', '书籍管理', 'el-icon-files');
INSERT INTO `permission` VALUES (3, 'Category', '/category', '分类管理', 'el-icon-menu');
INSERT INTO `permission` VALUES (4, 'Order', '/order', '我的订单', 'el-icon-s-order');
INSERT INTO `permission` VALUES (5, 'News', '/news', '新闻管理', 'el-icon-news');
INSERT INTO `permission` VALUES (6, 'Map', '/map', '百度地图', 'el-icon-map-location');
INSERT INTO `permission` VALUES (7, 'Im', '/im', '聊天室', 'el-icon-chat-round');
INSERT INTO `permission` VALUES (8, 'Message', '/message', '在线留言', 'el-icon-message');
INSERT INTO `permission` VALUES (9, 'User', '/user', '用户管理', 'el-icon-user');
INSERT INTO `permission` VALUES (10, 'Permission', '/permisssion', '权限菜单', 'el-icon-menu');
INSERT INTO `permission` VALUES (11, 'Role', '/role', '角色管理', 'el-icon-s-custom');
INSERT INTO `permission` VALUES (12, 'Person', '/person', '个人信息', '');
INSERT INTO `permission` VALUES (13, 'Password', '/password', '修改密码', NULL);
role表(RBAC权限模型)
DROP TABLE IF EXISTS `role`;
CREATE TABLE `role`  (
  `id` int(11) NOT NULL AUTO_INCREMENT COMMENT 'ID',
  `name` varchar(50) CHARACTER SET utf8mb4 COLLATE utf8mb4_unicode_ci NULL DEFAULT NULL COMMENT '名称',
  `comment` varchar(255) CHARACTER SET utf8mb4 COLLATE utf8mb4_unicode_ci NULL DEFAULT NULL COMMENT '备注',
  PRIMARY KEY (`id`) USING BTREE
) ENGINE = InnoDB AUTO_INCREMENT = 3 CHARACTER SET = utf8mb4 COLLATE = utf8mb4_unicode_ci ROW_FORMAT = Dynamic;
-- ----------------------------
-- Records of role
-- ----------------------------
INSERT INTO `role` VALUES (1, 'admin', '管理员');
INSERT INTO `role` VALUES (2, 'user', '普通用户');
role_permission表
CREATE TABLE `role_permission` (
  `role_id` int NOT NULL COMMENT '角色id',
  `permission_id` int NOT NULL COMMENT '资源id',
  PRIMARY KEY (`role_id`,`permission_id`) USING BTREE
) ENGINE=InnoDB DEFAULT CHARSET=utf8mb4 COLLATE=utf8mb4_unicode_ci ROW_FORMAT=DYNAMIC;
-- ----------------------------
-- Records of role_permission
-- ----------------------------
INSERT INTO `role_permission` VALUES (1, 1);
INSERT INTO `role_permission` VALUES (1, 2);
INSERT INTO `role_permission` VALUES (1, 3);
INSERT INTO `role_permission` VALUES (1, 4);
INSERT INTO `role_permission` VALUES (1, 5);
INSERT INTO `role_permission` VALUES (1, 6);
INSERT INTO `role_permission` VALUES (1, 7);
INSERT INTO `role_permission` VALUES (1, 8);
INSERT INTO `role_permission` VALUES (1, 9);
INSERT INTO `role_permission` VALUES (1, 10);
INSERT INTO `role_permission` VALUES (1, 11);
INSERT INTO `role_permission` VALUES (1, 12);
INSERT INTO `role_permission` VALUES (1, 13);
INSERT INTO `role_permission` VALUES (2, 1);
INSERT INTO `role_permission` VALUES (2, 2);
INSERT INTO `role_permission` VALUES (2, 3);
INSERT INTO `role_permission` VALUES (2, 4);
INSERT INTO `role_permission` VALUES (2, 5);
INSERT INTO `role_permission` VALUES (2, 6);
INSERT INTO `role_permission` VALUES (2, 7);
INSERT INTO `role_permission` VALUES (2, 8);
INSERT INTO `role_permission` VALUES (2, 13);
User表(RBAC权限模型)
CREATE TABLE `user` (
  `id` int NOT NULL AUTO_INCREMENT COMMENT 'ID',
  `username` varchar(255) COLLATE utf8mb4_unicode_ci DEFAULT NULL COMMENT '用户名',
  `password` varchar(255) COLLATE utf8mb4_unicode_ci DEFAULT NULL COMMENT '密码',
  `nick_name` varchar(255) COLLATE utf8mb4_unicode_ci DEFAULT NULL COMMENT '昵称',
  `age` int DEFAULT NULL COMMENT '年龄',
  `sex` varchar(255) COLLATE utf8mb4_unicode_ci DEFAULT NULL COMMENT '性别',
  `address` varchar(255) COLLATE utf8mb4_unicode_ci DEFAULT NULL COMMENT '地址',
  `avatar` varchar(255) COLLATE utf8mb4_unicode_ci DEFAULT NULL COMMENT '头像',
  PRIMARY KEY (`id`)
) ENGINE=InnoDB AUTO_INCREMENT=23 DEFAULT CHARSET=utf8mb4 COLLATE=utf8mb4_unicode_ci COMMENT='用户信息表';
user_role表
DROP TABLE IF EXISTS `user_role`;
CREATE TABLE `user_role`  (
  `user_id` int(11) NOT NULL COMMENT '用户id',
  `role_id` int(11) NOT NULL COMMENT '角色id',
  PRIMARY KEY (`user_id`, `role_id`) USING BTREE
) ENGINE = InnoDB CHARACTER SET = utf8mb4 COLLATE = utf8mb4_unicode_ci ROW_FORMAT = Dynamic;

-- ----------------------------
-- Records of user_role
-- ----------------------------
INSERT INTO `user_role` VALUES (1, 1);
INSERT INTO `user_role` VALUES (2, 1);
INSERT INTO `user_role` VALUES (3, 2);
Vue使用ElementUI
框架设计
用IDEA或WebStorm打开项目
删除APP中的引入HelloWorld的import
创建Header.vue,在template中写入HeaderH5文件
<template>
  <div style="height: 50px; line-height: 50px; border-bottom: 1px solid #ccc; display: flex">
      <div style="width: 200px">后台管理</div>
      <div style="flex: 1"></div>
      <div style="width: 100px">下拉框</div>
  </div>
</template>
在APP中引入Header
<template>
  <div>
        <Header/>
    <router-view/>
  </div>
</template>

<style>

</style>

<script>
import Header from "@/components/Header";

export default {
  name: "Layout",
  components: {
    Header
  }
}
</script>
创建自定义全局CSS,并在main中引入
*{
    margin: 0;
    padding: 0;
    box-sizing: border-box;

}
import '@/assets/css/global.css'
下载ElementUI
npm i element-ui -S #这里是Vue2.X版本的Element引入,3.X请引入Element-plus
在main中引入Element组件
import ElementUI from 'element-ui';
import 'element-ui/lib/theme-chalk/index.css';
Header中下拉框替换为ElementUI组件
      <el-dropdown>
        <span class="el-dropdown-link">
          张三<i class="el-icon-arrow-down el-icon--right"></i>
        </span>
        <el-dropdown-menu slot="dropdown">
          <el-dropdown-item>个人信息</el-dropdown-item>
          <el-dropdown-item>登出</el-dropdown-item>
        </el-dropdown-menu>
      </el-dropdown>
创建Aside.vue侧边栏文件并导入ElementUI组件
<div>
      <el-menu
          style="width: 200px;min-height: calc(100vh - 50px)"
          default-active="2"
          class="el-menu-vertical-demo">
        <el-submenu index="1-4">
          <template slot="title">选项1</template>
          <el-menu-item index="1-4-1">选项1-1</el-menu-item>
        </el-submenu>
        <el-menu-item index="2">
          <i class="el-icon-menu"></i>
          <span slot="title">导航二</span>
        </el-menu-item>
        <el-menu-item index="4">
          <i class="el-icon-setting"></i>
          <span slot="title">导航四</span>
        </el-menu-item>
      </el-menu>
  </div>
在Home下引入ElementUItable组件
<el-table
        :data="tableData"
        border
        style="width: 100%">
      <el-table-column
          prop="date"
          label="日期">
      </el-table-column>
      <el-table-column
          prop="name"
          label="姓名">
      </el-table-column>
      <el-table-column
          prop="address"
          label="地址">
      </el-table-column>
    </el-table>
删除router中的About跳转及页面
在main中引入国际化组件,ElementUI默认使用中文,ElementUIPuls默认使用英文请自行参考对应文档
import locale from 'element-ui/lib/locale/lang/en'

Vue.use(ElementUI, { locale });
在Home中设置中间盒子的大小宽度
<div style="padding: 10px">
在home中加入模拟数据
  data() {
    return{
      search: '',
      tableData: [
        {
          date: '2016-05-02',
          name: '王小虎',
          address: '上海市普陀区金沙江路 1518 弄'
        }, {
          date: '2016-05-04',
          name: '王小虎',
          address: '上海市普陀区金沙江路 1517 弄'
        }, {
          date: '2016-05-01',
          name: '王小虎',
          address: '上海市普陀区金沙江路 1519 弄'
        }, {
          date: '2016-05-03',
          name: '王小虎',
          address: '上海市普陀区金沙江路 1516 弄'
        }
      ]
    }
  },
添加home中的搜索;CRUD及分页功能
 <!--CRUD-->
    <div style="margin: 5px 0">
      <el-button type="primary">新增</el-button>
      <el-button type="primary">导入</el-button>
      <el-button type="primary">导出</el-button>
    </div>

    <!--搜索-->
    <div style="margin: 10px 0">
      <el-input v-model="search" placeholder="请输入关键字" style="width: 25%"></el-input>
      <el-button type="primary" style="margin-left: 7px">查询</el-button>
    </div>

   <!--分页-->
 <div style="margin: 10px 0">
      <el-pagination
          @size-change="handleSizeChange"
          @current-change="handleCurrentChange"
          :current-page="currentPage"
          :page-sizes="[5, 10, 20]"
          :page-size="10"
          layout="total, sizes, prev, pager, next, jumper"
          :total="total">
      </el-pagination>
    </div>
实现函数及变量
  data() {
    return{
      search: '',
      currentPage: 1,
      total: 10,
		....
	}


  methods: {
    handleClick() {

    },
    handleSizeChange() {

    },
    handleCurrentChange() {

    }
  }
在main中将整体结构设为small
Vue.use(ElementUI
    , {
    // locale,       //国际化组件引入
      size: 'small'
    }
);
引入ElementUI中的新增事件及弹窗
<el-button type="primary"  @click="add">新增</el-button>

<el-dialog title="提示" :visible.sync="dialogVisible" width="30%">
        <el-form label-width="80px">
          <el-form-item :moodel="form" label="用户名">
            <el-input v-model="form.username" style="width: 83%"></el-input>
          </el-form-item>
          <el-form-item :moodel="form" label="昵称">
            <el-input v-model="form.nickName" style="width: 83%"></el-input>
          </el-form-item>
          <el-form-item :moodel="form" label="年龄">
            <el-input v-model="form.age" style="width: 83%"></el-input>
          </el-form-item>
          <el-form-item :moodel="form" label="性别">
            <el-radio v-model="form.sex" label="男">男</el-radio>
            <el-radio v-model="form.sex" label="女">女</el-radio>
            <el-radio v-model="form.sex" label="未知">未知</el-radio>
          </el-form-item>
          <el-form-item :moodel="form" label="地址">
            <el-input type="textarea" v-model="form.address" style="width: 83%"></el-input>
          </el-form-item>
          </el-form>

        <span slot="footer" class="dialog-footer">
          <el-button @click="dialogVisible = false">取 消</el-button>
          <el-button type="primary" @click="save">确 定</el-button>
        </span>
</el-dialog>
methods: {
    add() {
      this.dialogVisible=true
      this.form = {}
    },
    save() {

    },
	...
}
 data() {
    return{
      form: {

      },
      dialogVisible: false,
      search: '',
      currentPage: 1,
      total: 10,
	...
}
使用axios来封装JSON与后台进行交互
本地安装axios插件
cnpm i axios -S
新建Utils文件夹,新建request.js
import axios from 'axios'

const request = axios.create({
    baseURL: '/api',  // 注意!! 这里是全局统一加上了 '/api' 前缀,也就是说所有接口都会加上'/api'前缀在,页面里面写接口的时候就不要加 '/api'了,否则会出现2个'/api',类似 '/api/api/user'这样的报错,切记!!!
    timeout: 5000
})

// request 拦截器
// 可以自请求发送前对请求做一些处理
// 比如统一加token,对请求参数统一加密
request.interceptors.request.use(config => {
    config.headers['Content-Type'] = 'application/json;charset=utf-8';

    // config.headers['token'] = user.token;  // 设置请求头
    return config
}, error => {
    return Promise.reject(error)
});

// response 拦截器
// 可以在接口响应后统一处理结果
request.interceptors.response.use(
    response => {
        let res = response.data;
        // 如果是返回的文件
        if (response.config.responseType === 'blob') {
            return res
        }
        // 兼容服务端返回的字符串数据
        if (typeof res === 'string') {
            res = res ? JSON.parse(res) : res
        }
        return res;
    },
    error => {
        console.log('err' + error) // for debug
        return Promise.reject(error)
    }
)


export default request
编写add逻辑
   save() {
      request.post("http://127.0.0.1:9090/user",this.form).then(res => {
        console.log(res)
      })
    },
发现跨域问题
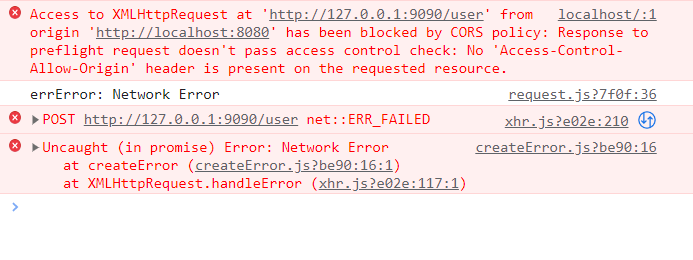
前端解决
在前端项目根目录下创建vue.config.js
// 跨域配置
module.exports = {
    devServer: {                //记住,别写错了devServer//设置本地默认端口  选填
        port: 9876,
        proxy: {                 //设置代理,必须填
            '/api': {              //设置拦截器  拦截器格式   斜杠+拦截器名字,名字可以自己定
                target: 'http://localhost:9999',     //代理的目标地址
                changeOrigin: true,              //是否设置同源,输入是的
                pathRewrite: {                   //路径重写
                    '^/api': ''                     //选择忽略拦截器里面的内容
                }
            }
        }
    }
}
后端解决跨域问题
@RestController
@RequestMapping("/user")
@CrossOrigin(origins = "*")
public class UserController {

    // Resource注解负责将Mapper引入
    @Resource
    UserMapper userMapper;

    // RequestBody此注解的含义为将Json文件转换成Java对象
    @PostMapping
    public Result save(@RequestBody User user){
        userMapper.insert(user);
        return Result.success();
    }
}
在方法上使用注解 @CrossOrigin
  @RequestMapping("/hello")
  @CrossOrigin(origins = "*")
   //@CrossOrigin(value = "http://localhost:8081") //指定具体ip允许跨域
  public String hello() {
        return "hello world";
  }
500错误及无法插入到数据库
- MybatisPlus新版不支持驼峰命名
- MybatisPlus新版映射实体类必须要将所有属性与数据库中属性一一对应,不可缺多缺少
- url配置不正确
- Mybatis版本太高
- SpringBoot后端没有配置ID自增属性
- MySQL的user表命名不规范,没有实现ID自增
- ID重复或冲突
- 在接口中没有写入@RequestBody
进行新增操作时,如果出现前端表单有传到后端,即在controller可以查看到数据,但是浏览器报500错,数据无法插入数据库,

可以尝试在User类中将@TableName("/user")中的/删去,

并且将application.properties中的url改为

spring.datasource.url=jdbc:mysql://localhost:3306/此处为你的数据库名?useUnicode=true&characterEncoding=UTF-8&serverTimezone=UTC

@RequestBody User user

application. properties加一句mybatis-plus. configuration. map-underscore-to-camel-case = false
实现CRUD方法
 methods: {
    load() {
      request.get("/user",{
        params: {
          pageNum: this.currentPage,				//动态绑定
          pageSize: this.pageSize,
          search: this.search
        }
      }).then(res => {
        console.log(res)
        this.tableData = res.data.records			//后端数据赋值
        this.total = res.data.total
      })
    },
    add() {
      this.dialogVisible=true
      this.form = {}
    },
    save() {
      request.post("/user",this.form).then(res => {
        console.log(res)
        this.tableData = res.data.records
      })
    },
    handleEdit(row) {
      this.form = JSON.parse(JSON.stringify(row))			//CP元数据,并隔离
      this.dialogVisible = true
    },
    handDelete() {

    },
    handleSizeChange() {

    },
    handleCurrentChange() {

    }
  }
}
增加弹窗及同步操作
save() {
      if (this.form.id){    //更新
        request.put("/user",this.form).then(res => {
          console.log(res)
          if(res.code === '0'){
            this.$message({
              type: "success",
              message: "更新成功"
            })
          } else {
            this.$message({
              type: "error",
              message: res.msg
            })
          }
        })
      } else  {   //新增
        request.post("/user",this.form).then(res => {
          console.log(res)
          if(res.code === '0'){
            this.$message({
              type: "success",
              message: "新增成功"
            })
          } else {
            this.$message({
              type: "error",
              message: res.msg
            })
          }
          this.load()   //刷新表格的数据
          this.dialogVisible = false    //关闭弹窗
        })
      }
    },
新增LoginView页面用于测试
<template>
  <div>
    登录
  </div>
</template>

<script>
export default {
  name: "LoginView"
}
</script>

<style scoped>

</style>
编写vue路由使得可以跳转到login页面
  {
    path: '/login',
    name: 'login',
    component: () => import("@/views/LoginView")
  }
由于使用了app.vue来当做根节点,所以我们发现我们的login页面是包含在后台管理布局中的
故新建layout文件夹(意为框架)
修改app前部分,并将其剪切过来
<template>
  <div>
    <!--头部-->
    <Header/>

    <!--主体-->
    <div style="display: flex">
      <!-- 侧边栏 -->
      <Aside/>
      <!--内容-->
      <router-view style="flex: 1" />
    </div>
  </div>
</template>


<script>
import Header from "@/components/Header";
import Aside from "@/components/Aside";


export default {
  name: "Layout",
  components: {
    Header,
    Aside
  }
}
</script>

<style scoped>

</style>
继续编写Login.vue为其增添为此页面增加逻辑判断及数据绑定
<template>
  <div style="width: 100%; height: 100vh; background: darkslateblue;overflow: hidden">
    <div style="width: 400px; margin: 150px auto">
      <div style="color: #cccccc; font-size: 30px; text-align: center; padding: 30px 0" >
        欢迎登录
      </div>
      <el-form ref="form" :model="form"  size="normal" :rules="rules" >
        <el-form-item prop="username">
          <el-input v-model="form.username" prefix-icon="el-icon-user-solid"></el-input>
        </el-form-item>
        <el-form-item prop="password">
          <el-input v-model="form.password" prefix-icon="el-icon-lock" show-password></el-input>
        </el-form-item>
        <el-form-item >
          <el-button style="width: 100%" type="primary" @click="login">登  录</el-button>
        </el-form-item>
      </el-form>
    </div>
  </div>
</template>

<script>
import request from "@/utils/request";

export default {
  name: "LoginView",
  data() {
    return{
      form: {},
      rules: {
        username: [
          { required: true, message: '请输入用户名', trigger: 'blur' }
        ],
        password: [
          { required: true, message: '请输入密码', trigger: 'blur' }
        ]
      }
    }
  },
  methods: {
    login() {
      this.$refs['form'].validate((valid) => {
        if (valid) {
          request.post("/user/login",this.form).then(res => {
            if (res.code === '0') {
              this.$message({
                type: "success",
                message: "登录成功"
              })
              this.$router.push("/")      //登陆成功后路由跳转
            } else {
              this.$message({
                type: "error",
                message: res.msg
              })
            }
          })
        }
      })
  }
  }
}
</script>

<style scoped>

</style>
新增服务
新增Book页
<template>
  <div style="padding: 10px">
    <!--    功能区域-->
    <div style="margin: 10px 0">
      <el-button type="primary" @click="add">新增</el-button>
    </div>

    <!--    搜索区域-->
    <div style="margin: 10px 0">
      <el-input v-model="search" placeholder="请输入关键字" style="width: 20%" clearable></el-input>
      <el-button type="primary" style="margin-left: 5px" @click="load">查询</el-button>
    </div>
    <el-table
        :data="tableData"
        border
        stripe
        style="width: 100%">
      <el-table-column
          prop="id"
          label="ID"
          sortable
      >
      </el-table-column>
      <el-table-column
          prop="name"
          label="名称">
      </el-table-column>
      <el-table-column
          prop="price"
          label="单价">
      </el-table-column>
      <el-table-column
          prop="author"
          label="作者">
      </el-table-column>
      <el-table-column
          prop="create_time"
          label="出版时间">
      </el-table-column>
      <el-table-column
          label="封面">
        <template #default="scope">
          <el-image
              style="width: 100px; height: 100px"
              :src="scope.row.cover"
              :preview-src-list="[scope.row.cover]">
          </el-image>
        </template>
      </el-table-column>
      <el-table-column label="操作">
        <template #default="scope">
          <el-button size="mini" @click="handleEdit(scope.row)">编辑</el-button>
          <el-popconfirm title="确定删除吗?" @confirm="handleDelete(scope.row.id)">
            <template #reference>
              <el-button size="mini" type="danger">删除</el-button>
            </template>
          </el-popconfirm>
        </template>
      </el-table-column>
    </el-table>

    <div style="margin: 10px 0">
      <el-pagination
          @size-change="handleSizeChange"
          @current-change="handleCurrentChange"
          :current-page="currentPage"
          :page-sizes="[5, 10, 20]"
          :page-size="pageSize"
          layout="total, sizes, prev, pager, next, jumper"
          :total="total">
      </el-pagination>

      <el-dialog title="提示" :visible.sync="dialogVisible" width="30%">
        <el-form :model="form" label-width="120px">
          <el-form-item label="名称">
            <el-input v-model="form.name" style="width: 80%"></el-input>
          </el-form-item>
          <el-form-item label="价格">
            <el-input v-model="form.price" style="width: 80%"></el-input>
          </el-form-item>
          <el-form-item label="作者">
            <el-input v-model="form.author" style="width: 80%"></el-input>
          </el-form-item>
          <el-form-item label="出版时间">
            <el-date-picker v-model="form.create_time"  type="date" style="width: 80%" clearable></el-date-picker>
          </el-form-item>
          <!--<el-form-item label="封面">-->
          <!--  <el-upload ref="upload" action="http://localhost:9090/files/upload" :on-success="filesUploadSuccess">-->
          <!--    <el-button type="primary">点击上传</el-button>-->
          <!--  </el-upload>  -->
          <!--</el-form-item>-->
        </el-form>
        <template #footer>
          <span class="dialog-footer">
            <el-button @click="dialogVisible = false">取 消</el-button>
            <el-button type="primary" @click="save">确 定</el-button>
          </span>
        </template>
      </el-dialog>

    </div>
  </div>
</template>

<script>


import request from "@/utils/request";

export default {
  name: 'Book',
  components: {

  },
  data() {
    return {
      form: {},
      dialogVisible: false,
      search: '',
      currentPage: 1,
      pageSize: 10,
      total: 0,
      tableData: []
    }
  },
  created() {
    this.load()
  },
  methods: {
    filesUploadSuccess(res) {
      console.log(res)
      this.form.cover = res.data
    },
    load() {
      request.get("/book", {
        params: {
          pageNum: this.currentPage,
          pageSize: this.pageSize,
          search: this.search
        }
      }).then(res => {
        console.log(res)
        this.tableData = res.data.records
        this.total = res.data.total
      })
    },
    add() {
      this.dialogVisible = true
      this.form = {}
      this.$refs['upload'].clearFiles()  // 清除历史文件列表
    },
    save() {
      if (this.form.id) {  // 更新
        request.put("/book", this.form).then(res => {
          console.log(res)
          if (res.code === '0') {
            this.$message({
              type: "success",
              message: "更新成功"
            })
          } else {
            this.$message({
              type: "error",
              message: res.msg
            })
          }

        })
      }  else {  // 新增
        request.post("/book", this.form).then(res => {
          console.log(res)
          if (res.code === '0') {
            this.$message({
              type: "success",
              message: "新增成功"
            })
          } else {
            this.$message({
              type: "error",
              message: res.msg
            })
            this.load() // 刷新表格的数据
            this.dialogVisible = false  // 关闭弹窗
          }

          this.load() // 刷新表格的数据
          this.dialogVisible = false  // 关闭弹窗
        })
      }

    },
    handleEdit(row) {
      this.form = JSON.parse(JSON.stringify(row))
      this.dialogVisible = true
      this.$nextTick(() => {
        this.$refs['upload'].clearFiles()  // 清除历史文件列表
      })

    },
    handleDelete(id) {
      console.log(id)
      request.delete("/book/" + id).then(res => {
        if (res.code === '0') {
          this.$message({
            type: "success",
            message: "删除成功"
          })
        } else {
          this.$message({
            type: "error",
            message: res.msg
          })
        }
        this.load()  // 删除之后重新加载表格的数据
      })
    },
    handleSizeChange(pageSize) {   // 改变当前每页的个数触发
      this.pageSize = pageSize
      this.load()
    },
    handleCurrentChange(pageNum) {  // 改变当前页码触发
      this.currentPage = pageNum
      this.load()
    }
  }
}
</script>
Aside高亮赋值
:default-active="path"


 created() {
    console.log(this.$route.path)
  },
  data() {
    return{
      path: this.$route.path
    }
  }
富文本编辑框
我们使用的是WangEditor富文本框架
npm安装Edit
#安装 editor
cnpm i wangeditor --save
将Book页面复制并重命名文News页,并将新增页面配置到路由及导航栏
重命名News中的数据部分,熟练应用Ctrl + R,并导入wangeditor
import E from 'wangeditor'
新建提示中的div盒子id为div1
 <el-dialog title="提示" :visible.sync="dialogVisible" width="50%">
      <el-form :model="form" label-width="120px">
        <el-form-item label="标题">
          <el-input v-model="form.title" style="width: 50%"></el-input>
        </el-form-item>

        <div id="div1"></div>
        <!--<el-form-item label="内容">-->
        <!--  <el-input v-model="form.price" style="width: 80%"></el-input>-->
        <!--</el-form-item>-->
      </el-form>
      <template #footer>
          <span class="dialog-footer">
            <el-button @click="dialogVisible = false">取 消</el-button>
            <el-button type="primary" @click="save">确 定</el-button>
          </span>
      </template>
    </el-dialog>
删除add方法中的clearfile,并使用同步方法this.$nextTick( () => {})来解决异步加载问题
  add() {
      this.dialogVisible = true
      this.form = {}

      this.$nextTick( () => {
        // 关联弹窗div,new一个,editor对象
        const editor = new E('#div1')
        editor.create()
      })

    },
这时我们就会看到所谓的副文本编辑器了
我们将editor设置为全局变量
let editor
同时我们将全局变量editor赋值给save方法中的form
add() {
      this.dialogVisible = true
      this.form = {}

      this.$nextTick( () => {
        // 关联弹窗div,new一个,editor对象
        editor = new E('#div1')
        editor.create()
      })

    },
    save() {
      this.form.content = editor.txt.html()     //获取  编辑器里面的值,然后赋予到实体
      if (this.form.id) {  // 更新
        request.put("/news", this.form).then(res => {
          console.log(res)
          if (res.code === '0') {
            this.$message({
              type: "success",
              message: "更新成功"
            })
          } else {
            this.$message({
              type: "error",
              message: res.msg
            })
          }
          this.dialogVisible = false
        })
      }  else {
			.....
我们将缓存中sessionStorage的User对象调用到该页面的add方法内(当然我们可以全局调用)
let userStr = sessionStorage.getItem("user") || "{}"
实现图片上传功能
在add方法中添加图片上传模组并定义请求对象名为file(改名称必须与后端接口接收名称对应)
    add() {
      this.dialogVisible = true
      this.form = {}

      this.$nextTick( () => {
        // 关联弹窗div,new一个,editor对象
        editor = new E('#div1')

        // 配置server接口地址
        editor.config.uploadImgServer = 'http://localhost:9090/files/editor/upload'
        editor.config.uploadFileName = "file"
        editor.create()
      })

    }
同时我们cv将部分方法粘到handleEdit方法中
如测试中发现初始化节点错误,则可在代码中进行判断
   handleEdit(row) {
      this.form = JSON.parse(JSON.stringify(row))
      this.dialogVisible = true
        this.$nextTick( () => {
          // 关联弹窗div,new一个,editor对象
          if(!editor) {
            editor = new E('#div1')

            // 配置server接口地址
            editor.config.uploadImgServer = 'http://localhost:9090/files/editor/upload'
            editor.config.uploadFileName = "file"       //设置上传参数名称
            editor.create()
          }

          editor.txt.html(row.content)
        })
      // this.$nextTick(() => {
      //   this.$refs['upload'].clearFiles()  // 清除历史文件列表
      // })
    },
实现访问控制
我们在Aside(导航栏)页面中的用户管理添加判断选项
 <el-submenu index="1" v-if="user.role === 1">
          <template slot="title">系统管理</template>
          <el-menu-item index="/user">用户管理</el-menu-item>
 </el-submenu>
我们同时在created中为其获取到sessionStorage中的User数据,并对服务端进行认证
  created() {
    // console.log(this.$route.path)
    let userStr = sessionStorage.getItem("user") || "{}"
    this.user = JSON.parse(userStr)

    // 请求服务端,确认当前登录用户的 合法信息
    request.get("/user/" + this.user.id).then(res => {
      if (res.code === '0') {
        this.user = res.data
      }
    })
  },
这样我们就看到了非管理员即role为2的时候新增不可见了
(但我们还是发现可以在缓存中修改数据从而提权进而获取数据)
我们将上述认证同时加入到Book及News页面,对对应按钮组件进行权限判断
我们发现还是前端还是保证不了数据安全的
故如若进行项目安全升级还需在后端设置Shiro,SpringSecurity等安全框架
添加验证码功能
在 components目录中新建文件ValidCode.vue
内容如下
<template>
  <div
      class="ValidCode disabled-select"
      :style="`width:${width}; height:${height}`"
      @click="refreshCode"
  >
    <span
        v-for="(item, index) in codeList"
        :key="index"
        :style="getStyle(item)"
    >{{ item.code }}</span>
  </div>
</template>

<script>
export default {
  name: 'ValidCode',
  model: {
    prop: 'value',
    event: 'input'
  },
  props: {
    width: {
      type: String,
      default: '100px'
    },
    height: {
      type: String,
      default: '40px'
    },
    length: {
      type: Number,
      default: 4
    },
    refresh: {
      type: Number
    }
  },
  data () {
    return {
      codeList: []
    }
  },
  watch: {
    refresh () {
      this.createdCode()
    }
  },
  mounted () {
    this.createdCode()
  },
  methods: {
    refreshCode () {
      this.createdCode()
    },
    createdCode () {
      const len = this.length
      const codeList = []
      const chars = 'ABCDEFGHJKMNPQRSTWXYZabcdefhijkmnprstwxyz0123456789'
      const charsLen = chars.length
      // 生成
      for (let i = 0; i < len; i++) {
        const rgb = [Math.round(Math.random() * 220), Math.round(Math.random() * 240), Math.round(Math.random() * 200)]
        codeList.push({
          code: chars.charAt(Math.floor(Math.random() * charsLen)),
          color: `rgb(${rgb})`,
          fontSize: `${10 + (+[Math.floor(Math.random() * 10)] + 6)}px`,
          padding: `${[Math.floor(Math.random() * 10)]}px`,
          transform: `rotate(${Math.floor(Math.random() * 90) - Math.floor(Math.random() * 90)}deg)`
        })
      }
      // 指向
      this.codeList = codeList
      // 将当前数据派发出去
      // console.log(codeList.map(item => item.code).join(''))
      this.$emit('input', codeList.map(item => item.code).join(''))
    },
    getStyle (data) {
      return `color: ${data.color}; font-size: ${data.fontSize}; padding: ${data.padding}; transform: ${data.transform}`
    }
  }
}
</script>

<style scoped>

</style>
我们同时也要修改Login页面文件,来显示验证码
这里还是建议使用后端来处理验证码,这样会出现安全问题
添加文件上传功能
在User页面中的上传按钮添加以下数据
<!--    功能区域-->
    <div style="margin: 10px 0">
      <el-button type="primary" @click="add">新增</el-button>
      <el-upload
        action="http://localhost:9090/user/import"
        :on-success="handleUploadSuccess"
        :show-file-list=false
        :limit="1"
        accept='.xlsx'
        style="display: inline-block; margin: 0 10px"
      >
        <el-button type="primary">导入</el-button>
      </el-upload>
      <el-button type="primary" @click="exportUser">导出</el-button>
    </div>
函数部分
handleUploadSuccess(res) {
      if (res.code === "0") {
        this.$message.success("导入成功")
        this.load()
      }
    },
    exportUser() {
      location.href = "http://" + window.server.filesUploadUrl + ":9090/user/export";
    },
画外音
写到这里时我们发现之前的页面没有进行测试,在增代码删代码测试等一系列措施后,皆无法补救,
这时我想起了版本控制git的重大作用了!
git reflog					#查看git版本控制
git reset --hard [version number]				#回溯至版本号
我竟然回到了Vue-NewsServiceComple版本才恢复正常
心态崩了
探究了下之前的版本均未发现问题,可能是直接将项目复制粘贴到另一个文件夹的问题,也有可能是一对多连表查询出现了错误
对应后端的一查多我们在User表中添加一个功能按钮来实现一查多
在User页面添加该弹窗
  <el-dialog title="用户拥有的图书列表" :visible.sync="bookVis" width="30%">
      <el-table :data="bookList" stripe border>
        <el-table-column prop="id" label="ID"></el-table-column>
        <el-table-column prop="name" label="名称"></el-table-column>
        <el-table-column prop="price" label="价格"></el-table-column>
      </el-table>
    </el-dialog>
原项目使用的是v-model来绑定对象,但在我这里失败了,故我自己采用了:visible.sync
替换对应的按钮并绑定对应的方法
<el-table-column label="操作" width="260">
<el-button size="mini" type="success" plain @click="showBooks(scope.row.bookList)">查看图书列表</el-button>
<el-button size="mini" type="primary" plain @click="handleEdit(scope.row)">编辑</el-button>
在Data中添加变量
bookVis: false,
bookList: []
在methons添加对应的方法
 showBooks(books) {
      this.bookVis = true
      this.bookList = books
    },
实现表格加载等待画面
我们直接在前端页面设置,可以是任何页面
我们在Table标签中添加该属性来实现表格加载动画
v-loading="loading"
设置全局风格
<style>
body {
  margin: 0;
}
</style>
设置页面变量
loading: true
然后将加载方法中的最后一步添加加载对应的false,来关闭加载
this.loading = false
其他页面同理
实现批量删除方法
在Book页面功能区域新增以下按钮组件
      <el-popconfirm
          title="确定删除吗?"
          @confirm="deleteBatch"
      >
        <template #reference>
          <el-button type="danger" v-if="user.role === 1">批量删除</el-button>
        </template>
      </el-popconfirm>
并在表单上添加多选框
 style="width: 100%"
        @selection-change="handleSelectionChange"
    >
      <el-table-column
          type="selection"
          width="55">
      </el-table-column>
增加上传路径对象和数组,来进行遍历删除
filesUploadUrl: "http://localhost:9090/files/upload",
ids: []
增加DeleteBatch方法
 deleteBatch() {
      if (!this.ids.length) {
        this.$message.warning("请选择数据!")
        return
      }
      request.post("/book/deleteBatch", this.ids).then(res => {
        if (res.code === '0') {
          this.$message.success("批量删除成功")
          this.load()
        } else {
          this.$message.error(res.msg)
        }
      })
    },
    handleSelectionChange(val) {
      this.ids = val.map(v => v.id)
    },
添加分类功能页
增加Category.vue页面,代码如下
<template>
  <div style="padding: 10px">
    <!--    功能区域-->
    <!--    <div style="margin: 10px 0">-->
    <!--      <el-button type="primary" @click="add" v-if="user.role === 1">新增</el-button>-->
    <!--    </div>-->

    <!--    搜索区域-->
    <!--    <div style="margin: 10px 0">-->
    <!--      <el-input v-model="search" placeholder="请输入关键字" style="width: 20%" clearable></el-input>-->
    <!--      <el-button type="primary" style="margin-left: 5px" @click="load">查询</el-button>-->
    <!--    </div>-->
    <el-table
        v-loading="loading"
        :data="tableData"
        border
        stripe
        style="width: 100%"
        row-key="id"
        default-expand-all
    >
      <!--      <el-table-column-->
      <!--          prop="id"-->
      <!--          label="ID"-->
      <!--          sortable-->
      <!--      >-->
      <!--      </el-table-column>-->
      <el-table-column
          prop="name"
          label="名称">
      </el-table-column>
      <el-table-column label="操作">
        <template #default="scope">
          <el-button size="mini" @click="handleEdit(scope.row)" v-if="user.role === 1">编辑</el-button>
          <el-popconfirm title="确定删除吗?" @confirm="handleDelete(scope.row.id)" v-if="user.role === 1">
            <template #reference>
              <el-button size="mini" type="danger" style="margin-left: 10px">删除</el-button>
            </template>
          </el-popconfirm>
        </template>
      </el-table-column>
    </el-table>

    <div style="margin: 10px 0">
      <el-dialog title="提示" :visible.sync="dialogVisible" width="30%">
        <el-form :model="form" label-width="120px">
          <el-form-item label="名称">
            <el-input v-model="form.name" style="width: 80%"></el-input>
          </el-form-item>
        </el-form>
        <template #footer>
          <span class="dialog-footer">
            <el-button @click="dialogVisible = false">取 消</el-button>
            <el-button type="primary" @click="save">确 定</el-button>
          </span>
        </template>
      </el-dialog>

    </div>
  </div>
</template>

<script>
import request from "@/utils/request";
export default {
  name: 'Category',
  components: {
  },
  data() {
    return {
      user: {},
      loading: true,
      form: {},
      dialogVisible: false,
      search: '',
      currentPage: 1,
      pageSize: 10,
      total: 0,
      tableData: [],
    }
  },
  created() {
    let userStr = sessionStorage.getItem("user") || "{}"
    this.user = JSON.parse(userStr)
    // 请求服务端,确认当前登录用户的 合法信息
    request.get("/user/" + this.user.id).then(res => {
      if (res.code === '0') {
        this.user = res.data
      }
    })
    this.load()
  },
  methods: {
    load() {
      this.loading = true
      request.get("/category").then(res => {
        this.loading = false
        this.tableData = res.data
      })
    },
    add() {
      this.dialogVisible = true
      this.form = {}
    },
    save() {
      if (this.form.id) {  // 更新
        request.put("/category", this.form).then(res => {
          console.log(res)
          if (res.code === '0') {
            this.$message({
              type: "success",
              message: "更新成功"
            })
          } else {
            this.$message({
              type: "error",
              message: res.msg
            })
          }
          this.load() // 刷新表格的数据
          this.dialogVisible = false  // 关闭弹窗
        })
      }  else {  // 新增
        request.post("/category", this.form).then(res => {
          console.log(res)
          if (res.code === '0') {
            this.$message({
              type: "success",
              message: "新增成功"
            })
          } else {
            this.$message({
              type: "error",
              message: res.msg
            })
          }
          this.load() // 刷新表格的数据
          this.dialogVisible = false  // 关闭弹窗
        })
      }
    },
    handleEdit(row) {
      this.form = JSON.parse(JSON.stringify(row))
      this.dialogVisible = true
    },
    handleDelete(id) {
      console.log(id)
      request.delete("/category/" + id).then(res => {
        if (res.code === '0') {
          this.$message({
            type: "success",
            message: "删除成功"
          })
        } else {
          this.$message({
            type: "error",
            message: res.msg
          })
        }
        this.load()  // 删除之后重新加载表格的数据
      })
    },
    handleSizeChange(pageSize) {   // 改变当前每页的个数触发
      this.pageSize = pageSize
      this.load()
    },
    handleCurrentChange(pageNum) {  // 改变当前页码触发
      this.currentPage = pageNum
      this.load()
    }
  }
}
</script>
为其添加导航栏按钮及路由指向
<el-menu-item index="/category">分类管理</el-menu-item>
{
    path: 'category',
    name: 'Category',
    component: () => import("@/views/Category"),
}
由于之后的项目功能添加没有详细视频,故以下添加主页及功能,请参考原项目版本迭代
添加Home主页,并集成Echarts
由于我使用的是Vue2.0故在引入Echarts时将变量替换成$echarts,main入口引入同理
<template>
  <div style="padding: 10px">
    <el-card>
      <div id="chart" :style="{width: '800px', height: '600px'}"></div>
    </el-card>
  </div>
</template>

<script>
import request from "@/utils/request";

export default {
  name: "Home",
  data() {
    return {
      msg: 'Welcome to Your Vue.js App'
    }
  },
  mounted() {
    this.drawLine();
  },
  methods: {
    drawLine() {
      // 基于准备好的dom,初始化echarts实例
      let chart = this.$echarts.init(document.getElementById('chart'))
      let option = {
        title: {
          text: '各地区用户比例统计图',
          subtext: '虚拟数据',
          left: 'left'
        },
        legend: {
          trigger: 'item'
        },
        toolbox: {
          show: true,
          feature: {
            mark: {show: true},
            dataView: {show: true, readOnly: false},
            restore: {show: true},
            saveAsImage: {show: true}
          }
        },
        series: [
          {
            name: '用户比例',
            type: 'pie',
            radius: [50, 250],
            center: ['50%', '50%'],
            roseType: 'area',
            itemStyle: {
              borderRadius: 8
            },
            data: []
          }
        ]
      }
      request.get("/user/count").then(res => {
        res.data.forEach(item => {
          option.series[0].data.push({name: item.address, value: item.count})
        })
        // 绘制图表
        chart.setOption(option);
      })

    }
  }
}
</script>

<style scoped>

</style>
前端适配JWT
修改回复JS文件request.js中的request.interceptors.request.use方法
// 取出sessionStorage里面缓存的用户信息
    let userJson = sessionStorage.getItem("user")
    if (!whiteUrls.includes(config.url)) {  // 校验请求白名单
        if(!userJson) {
            router.push("/login")
        } else {
            let user = JSON.parse(userJson);
            config.headers['token'] = user.token;  // 设置请求头
        }
    }
添加百度地图页面
新增Map.vue,并为其添加路由和导航栏
<template>
  <div>
    <div id="container" style="width: 100%;height:100%"></div>
  </div>
</template>

<script>
export default {
  name: "Map",
  data() {
    return {
    }
  },
  mounted() {
    // 百度地图API功能
    var map = new BMapGL.Map('container'); // 创建Map实例
    map.centerAndZoom(new BMapGL.Point(116.404, 39.915), 12); // 初始化地图,设置中心点坐标和地图级别
    map.enableScrollWheelZoom(true); // 开启鼠标滚轮缩放
    function myFun(result){
      var cityName = result.name;
      map.setCenter(cityName);
      // alert("当前定位城市:"+cityName);
    }
    var myCity = new BMapGL.LocalCity();
    myCity.get(myFun);
  }
}
</script>

<style scoped>
</style>
  	  {
        path: 'map',
        name: 'Map',
        component: () => import("@/views/Map"),
      }
<el-menu-item index="/map">百度地图</el-menu-item>
修改public文件夹中的index文件
<!DOCTYPE html>
<html lang="">
<head>
    <meta charset="utf-8">
    <meta http-equiv="X-UA-Compatible" content="IE=edge">
    <meta name="viewport" content="width=device-width,initial-scale=1.0">
    <link rel="icon" href="<%= BASE_URL %>favicon.ico">
    <title><%= htmlWebpackPlugin.options.title %></title>
    <script src="static/config.js"></script>
    <script type="text/javascript" src="https://api.map.baidu.com/api?v=1.0&type=webgl&ak=bmvg8yeOopwOB4aHl5uvx52rgIa3VrPO"></script>
</head>
<body>
<noscript>
    <strong>We're sorry but <%= htmlWebpackPlugin.options.title %> doesn't work properly without JavaScript enabled. Please enable it to continue.</strong>
</noscript>
<div id="app"></div>
<!-- built files will be auto injected -->
</body>
</html>
新增聊天室功能
为其增添路由及导航栏
<el-menu-item index="/im">聊天室</el-menu-item>
	  {
        path: 'im',
        name: 'Im',
        component: () => import("@/views/Im"),
      }
新增Im.vue
<template>
  <div style="padding: 10px; margin-bottom: 50px">
    <el-row>
      <el-col :span="4">
        <el-card style="width: 300px; height: 300px; color: #333">
          <div style="padding-bottom: 10px; border-bottom: 1px solid #ccc">在线用户<span style="font-size: 12px">(点击聊天气泡开始聊天)</span></div>
          <div style="padding: 10px 0" v-for="user in users" :key="user.username">
            <span>{{ user.username }}</span>
            <i class="el-icon-chat-dot-round" style="margin-left: 10px; font-size: 16px; cursor: pointer"
               @click="chatUser = user.username"></i>
            <span style="font-size: 12px;color: limegreen; margin-left: 5px" v-if="user.username === chatUser">chatting...</span>
          </div>
        </el-card>
      </el-col>

      <el-col :span="20">
        <div style="width: 800px; margin: 0 auto; background-color: white;
                    border-radius: 5px; box-shadow: 0 0 10px #ccc">
          <div style="text-align: center; line-height: 50px;">
            Web聊天室({{ chatUser }})
          </div>
          <div style="height: 350px; overflow:auto; border-top: 1px solid #ccc" v-html="content"></div>
          <div style="height: 200px">
            <textarea v-model="text" style="height: 160px; width: 100%; padding: 20px; border: none; border-top: 1px solid #ccc;
             border-bottom: 1px solid #ccc; outline: none"></textarea>
            <div style="text-align: right; padding-right: 10px">
              <el-button type="primary" size="mini" @click="send">发送</el-button>
            </div>
          </div>
        </div>
      </el-col>
    </el-row>
  </div>
</template>

<script>

import request from "@/utils/request";

let socket;

export default {
  name: "Im",
  data() {
    return {
      circleUrl: 'https://cube.elemecdn.com/3/7c/3ea6beec64369c2642b92c6726f1epng.png',
      user: {},
      isCollapse: false,
      users: [],
      chatUser: '',
      text: "",
      messages: [],
      content: ''
    }
  },
  created() {
    this.init()
  },
  methods: {
    send() {
      if (!this.chatUser) {
        this.$message({type: 'warning', message: "请选择聊天对象"})
        return;
      }
      if (!this.text) {
        this.$message({type: 'warning', message: "请输入内容"})
      } else {
        if (typeof (WebSocket) == "undefined") {
          console.log("您的浏览器不支持WebSocket");
        } else {
          console.log("您的浏览器支持WebSocket");
          let message = {from: this.user.username, to: this.chatUser, text: this.text}
          socket.send(JSON.stringify(message));
          this.messages.push({user: this.user.username, text: this.text})
          // 构建消息内容,本人消息
          this.createContent(null, this.user.username, this.text)
          this.text = '';
        }
      }
    },
    createContent(remoteUser, nowUser, text) {
      let html
      // 当前用户消息
      if (nowUser) {
        html = "<div class=\"el-row\" style=\"padding: 5px 0\">\n" +
            "  <div class=\"el-col el-col-22\" style=\"text-align: right; padding-right: 10px\">\n" +
            "    <div class=\"tip left\">" + text + "</div>\n" +
            "  </div>\n" +
            "  <div class=\"el-col el-col-2\">\n" +
            "  <span class=\"el-avatar el-avatar--circle\" style=\"height: 40px; width: 40px; line-height: 40px;\">\n" +
            "    <img src=\"https://cube.elemecdn.com/3/7c/3ea6beec64369c2642b92c6726f1epng.png\" style=\"object-fit: cover;\">\n" +
            "  </span>\n" +
            "  </div>\n" +
            "</div>";
      } else if (remoteUser) {   // 远程用户消息
        html = "<div class=\"el-row\" style=\"padding: 5px 0\">\n" +
            "  <div class=\"el-col el-col-2\" style=\"text-align: right\">\n" +
            "  <span class=\"el-avatar el-avatar--circle\" style=\"height: 40px; width: 40px; line-height: 40px;\">\n" +
            "    <img src=\"https://cube.elemecdn.com/3/7c/3ea6beec64369c2642b92c6726f1epng.png\" style=\"object-fit: cover;\">\n" +
            "  </span>\n" +
            "  </div>\n" +
            "  <div class=\"el-col el-col-22\" style=\"text-align: left; padding-left: 10px\">\n" +
            "    <div class=\"tip right\">" + text + "</div>\n" +
            "  </div>\n" +
            "</div>";
      }
      console.log(html)
      this.content += html;
    },
    init() {
      this.user = sessionStorage.getItem("user") ? JSON.parse(sessionStorage.getItem("user")) : {}
      let username = this.user.username;
      let _this = this;
      if (typeof (WebSocket) == "undefined") {
        console.log("您的浏览器不支持WebSocket");
      } else {
        console.log("您的浏览器支持WebSocket");
        let socketUrl = "ws://localhost:9090/imserver/" + username;
        if (socket != null) {
          socket.close();
          socket = null;
        }
        socket = new WebSocket(socketUrl);
        //打开事件
        socket.onopen = function () {
          console.log("websocket已打开");
        };
        //获得消息事件
        socket.onmessage = function (msg) {
          console.log("收到数据====" + msg.data)
          let data = JSON.parse(msg.data)
          if (data.users) {  // 获取在线人员信息
            _this.users = data.users.filter(user => user.username !== username)
          } else {
     		 if (data.from === _this.chatUser) {
              _this.messages.push(data)
              // 构建消息内容
              _this.createContent(data.from, null, data.text)
            }
          }
        };
        //关闭事件
        socket.onclose = function () {
          console.log("websocket已关闭");
        };
        //发生了错误事件
        socket.onerror = function () {
          console.log("websocket发生了错误");
        }
      }
    }

  }
}

</script>

<style>
.tip {
  color: white;
  text-align: center;
  border-radius: 10px;
  font-family: sans-serif;
  padding: 10px;
  width:auto;
  display:inline-block !important;
  display:inline;
}

.right {
  background-color: deepskyblue;
}
.left {
  background-color: forestgreen;
}
</style>
新增头像功能
将Header页面中的标签替换成如下能容
<span class="el-dropdown-link">
          <el-avatar :size="30" :src="user.avatar" style="position: relative; top: 10px"></el-avatar>
           {{ user.nickName }}
          <i class="el-icon-arrow-down el-icon--right"></i>
</span>
新增Person页面(个人信息)的头像显示及上传方法
 <el-card style="width: 40%; margin: 10px">
      <el-form ref="form" :model="form" label-width="80px">
        <el-form-item style="text-align: center" label-width="0">
          <el-upload
              class="avatar-uploader"
              action="http://localhost:9090/files/upload"
              :show-file-list="false"
              :on-success="handleAvatarSuccess"
          >
            <img v-if="form.avatar" :src="form.avatar" class="avatar">
            <i v-else class="el-icon-plus avatar-uploader-icon"></i>
          </el-upload>
        </el-form-item>
        <el-form-item label="用户名">
          <el-input v-model="form.username" disabled></el-input>
        </el-form-item>
          ...
methods: {
    handleAvatarSuccess(res) {
      this.form.avatar = res.data
      this.$message.success("上传成功")
      // this.update()
    },
设置个人信息页的全局CSS配置
<style>
.avatar-uploader .el-upload {
  border: 1px dashed #d9d9d9;
  border-radius: 6px;
  cursor: pointer;
  position: relative;
  overflow: hidden;
}
.avatar-uploader .el-upload:hover {
  border-color: #409EFF;
}
.avatar-uploader-icon {
  font-size: 28px;
  color: #8c939d;
  width: 120px;
  height: 120px;
  line-height: 120px;
  text-align: center;
}
.avatar {
  width: 178px;
  height: 178px;
  display: block;
}
</style>
新增留言板功能
为其增加路由及导航栏页面
	  {
        path: 'message',
        name: 'Message',
        component: () => import("@/views/Message"),
      }
<el-menu-item index="/message">在线留言</el-menu-item>
增加Message页面
<template>
  <div style="margin-top: 10px; margin-bottom: 80px">
    <el-card>
      <div style="padding: 20px; color: #888">
        <div>
          <el-input type="textarea" :rows="3" v-model="entity.content"></el-input>
          <div style="text-align: right; padding: 10px"><el-button type="primary" @click="save">留言</el-button></div>
        </div>
      </div>

      <div style="display: flex; padding: 20px" v-for="item in messages">
        <div style="text-align: center; flex: 1">
          <el-image :src="item.avatar" style="width: 60px; height: 60px; border-radius: 50%"></el-image>
        </div>
        <div style="padding: 0 10px; flex: 5">
          <div><b style="font-size: 14px">{{ item.username }}</b></div>
          <div style="padding: 10px 0; color: #888">
            {{ item.content }}
            <el-button type="text" size="mini" @click="del(item.id)" v-if="item.username === user.username">删除</el-button>
          </div>
          <div style="background-color: #eee; padding: 10px" v-if="item.parentMessage">{{ item.username }}:{{ item.parentMessage.content }}</div>
          <div style="color: #888; font-size: 12px">
            <span>{{ item.time  }}</span>
            <el-button type="text" style="margin-left: 20px" @click="reReply(item.id)">回复</el-button>
          </div>
        </div>
      </div>

      <el-dialog title="回复信息" :visible.sync="dialogFormVisible" width="30%">
        <el-form :model="entity" label-width="80px">
          <el-form-item label="内容">
            <el-input v-model="entity.reply" autocomplete="off" type="textarea" :rows="3"></el-input>
          </el-form-item>
        </el-form>
        <template #footer>
          <el-button @click="cancel">取 消</el-button>
          <el-button type="primary" @click="reply">确 定</el-button>
        </template>
      </el-dialog>
    </el-card>


  </div>
</template>

<script>
import request from "@/utils/request";
export default {
  name: "Message",
  data() {
    return {
      user: {},
      messages: [],
      dialogFormVisible: false,
      isCollapse: false,
      entity: {}
    }
  },
  created() {
    this.user = sessionStorage.getItem("user") ? JSON.parse(sessionStorage.getItem("user")) : {};
    this.loadMessage();
  },
  methods: {
    loadMessage() {
      // 如果是留言的话,就写死=0
      // 如果是 评论,则需要设置 当前被评论的模块的id作为foreignId
      let foreignId = 0;
      request.get("/message/foreign/" + foreignId).then(res => {
        this.messages = res.data;
      })
    },
    cancel() {
      this.dialogFormVisible = false;
      this.entity = {};
    },
    reReply(id) {
      this.dialogFormVisible = true;
      this.entity.parentId = id;
    },
    reply() {
      this.entity.content = this.entity.reply;
      this.save();
    },
    save() {
      if (!this.user.username) {
        this.$message({
          message: "请登录",
          type: "warning"
        });
        return;
      }
      if (!this.entity.content) {
        this.$message({
          message: "请填写内容",
          type: "warning"
        });
        return;
      }
      // 如果是评论的话,在 save的时候要注意设置 当前模块的id为 foreignId。也就是  entity.foreignId = 模块id
      request.post("/message", this.entity).then(res => {
        if (res.code === '0') {
          this.$message({
            message: "评论成功",
            type: "success"
          });
        } else {
          this.$message({
            message: res.msg,
            type: "error"
          });
        }
        this.entity = {}
        this.loadMessage();
        this.dialogFormVisible = false;
      })
    },
    del(id) {
      request.delete("/message/" + id).then(res => {
        this.$message({
          message: "删除成功",
          type: "success"
        });
        this.loadMessage()
      })
    }
  }
}
</script>
Bug说明:无法实现回复功能
在后端交互断点中并未发现数据异常,可能是前端的request的问题,但是并没有发现问题
后续由于根据原项目版本迭代增加了很多功能,故例如动态背景,图标这些简单的我就一带而过了,因为写文档这些也挺麻烦,详情请查看git版本迭代
RBAC权限模型(一阶段)
由于上次直接将代码CV过来,出的问题比较多,所以回头分为两个阶段来实现RBAC模型
该阶段主要集成后端代码,前端改动较少
导航栏将
:default-active="path"
//以上代码替换成以下代码,用来以后用来做动态路由
:default-active="$route.path"

//删除以下代码
path: this.$route.path
登录页删除不必要的选项及按钮
需要删除的
			<el-form-item>
              <el-radio v-model="form.role" :label="1" style="color: white">管理员</el-radio>
              <el-radio v-model="form.role" :label="2" style="color: white">普通用户</el-radio>
            </el-form-item>
动态路由
由于安全问题,我们将路由信息存储在数据库中,同时降低耦合度,提高其可扩展性,我们对该项目将集成动态路由
由于我们要实现动态路由,首先要把原来写死的导航栏及路由删除
以下代码均为需删除代码,及其替换代码
Aside导航栏
 <el-menu-item index="/home">主页</el-menu-item>
        <el-menu-item index="/category">分类管理</el-menu-item>
        <el-menu-item index="/book">书籍管理</el-menu-item>
        <el-menu-item index="/news">新闻管理</el-menu-item>
        <el-menu-item index="/map">百度地图</el-menu-item>
        <el-menu-item index="/im">聊天室</el-menu-item>
        <el-menu-item index="/message">在线留言</el-menu-item>
        <el-submenu index="1" v-if="user.role === 1">
          <template slot="title">系统管理</template>
          <el-menu-item index="/user">用户管理</el-menu-item>
        </el-submenu>
替换为以下代码
<el-menu-item :index="m.path" v-for="m in user.permissions" :key="m.id">
          <div v-if="matchState(m.path)">
            <i :class="m.icon"></i>  {{ m.comment }}
          </div>
        </el-menu-item>


methods: {
    matchState(string = "") {
      return string !== "/person";
    }
  }
删除之前用于身份验证的简单js
request.get("/user/" + this.user.id).then(res => {
      if (res.code === '0') {
        this.user = res.data
      }
    })
router/index.js
  },
      {
        path: 'user',
        name: 'User',
        component: () => import("@/views/User")
      },
      {
        path: 'person',
        name: 'Person',
        component: () => import("@/views/Person"),
      },
      {
        path: 'book',
        name: 'Book',
        component: () => import("@/views/Book")
      },
      {
        path: 'news',
        name: 'News',
        component: () => import("@/views/News")
      },
      {
        path: 'category',
        name: 'Category',
        component: () => import("@/views/Category"),
      },
      {
        path: 'map',
        name: 'Map',
        component: () => import("@/views/Map"),
      },
      {
        path: 'im',
        name: 'Im',
        component: () => import("@/views/Im"),
      },
      {
        path: 'message',
        name: 'Message',
        component: () => import("@/views/Message"),


  {
    path: '/about',
    name: 'about',
    component: () => import("@/views/User")
  },
简而言之,就是删除除了家目录本目录以外的全部子路由,当然还有about路由
将获取到的路由信息实现,同时加入拦截器及刷新重置
// 在刷新页面的时候重置当前路由
activeRouter()

function activeRouter() {
  const userStr = sessionStorage.getItem("user")
  if (userStr) {
    const user = JSON.parse(userStr)
    let root = {
      path: '/',
      name: 'Layout',
      component: Layout,
      redirect: "/home",
      children: []
    }
    user.permissions.forEach(p => {
      let obj = {
        path: p.path,
        name: p.name,
        component: () => import("@/views/" + p.name)
      };
      root.children.push(obj)
    })
    if (router) {
      router.addRoute(root)
    }
  }
}

router.beforeEach((to, from, next) => {
  if (to.path === '/login' || to.path === '/register')  {
    next()
    return
  }
  let user = sessionStorage.getItem("user") ? JSON.parse(sessionStorage.getItem("user")) : {}
  if (!user.permissions || !user.permissions.length) {
    next('/login')
  } else if (!user.permissions.find(p => p.path === to.path)) {
    next('/login')
  } else {
    next()
  }
新建Utils包中的permission.js文件,用于设置和导入后端传来的路由信息
export function activeRouter() {
    const userStr = sessionStorage.getItem("user")
    if (userStr) {
        const user = JSON.parse(userStr)
        let root = {
            path: '/',
            name: 'Layout',
            component: Layout,
            redirect: "/home",
            children: []
        }
        user.permissions.forEach(p => {
            let obj = {
                path: p.path,
                name: p.name,
                component: () => import("@/views/" + p.name)
            };
            root.children.push(obj)
        })
        if (router) {
            router.addRoute(root)
        }
    }
我们将写好的js文件导入至登录页并进行配置
login.vue
import {activeRouter} from "@/utils/permission";
在login方法中将路由信息初始化
              // 初始化路由信息
              activeRouter()
源码
  login() {
      this.$refs['form'].validate((valid) => {
        if (valid) {
          if (!this.form.validCode) {
            this.$message.error("请填写验证码")
            return
          }
          if(this.form.validCode.toLowerCase() !== this.validCode.toLowerCase()) {
            this.$message.error("验证码错误")
            return
          }
          request.post("/user/login",this.form).then(res => {
            if (res.code === '0') {
              this.$message({
                type: "success",
                message: "登录成功"
              })
              sessionStorage.setItem("user",JSON.stringify(res.data))   //缓存用户信息

+              // 初始化路由信息
+              activeRouter()

              this.$router.push("/")      //登陆成功后路由跳转
}
RBAC权限模型(二阶段)
Permission(权限)页面
<template>
  <div style="padding: 10px">
    <!--    功能区域-->
    <div style="margin: 10px 0">
      <el-button type="primary" @click="add">新增</el-button>
    </div>

    <!--    搜索区域-->
    <div style="margin: 10px 0">
      <el-input v-model="search" placeholder="请输入关键字" style="width: 20%" clearable></el-input>
      <el-button type="primary" style="margin-left: 5px" @click="load">查询</el-button>
    </div>
    <el-table
        v-loading="loading"
        :data="tableData"
        border
        stripe
        style="width: 100%">
      <el-table-column
          prop="id"
          label="ID"
          sortable
          width="80"
      >
      </el-table-column>
      <el-table-column
          prop="name"
          label="名称">
      </el-table-column>
      <el-table-column
          prop="path"
          label="路径">
      </el-table-column>
      <el-table-column
          prop="comment"
          label="备注">
      </el-table-column>
      <el-table-column
          prop="icon"
          label="图标">
      </el-table-column>
      <el-table-column label="操作">
        <template #default="scope">
          <el-button size="mini" @click="handleEdit(scope.row)">编辑</el-button>
          <el-popconfirm title="确定删除吗?" @confirm="handleDelete(scope.row.id)">
            <template #reference>
              <el-button size="mini" type="danger" style="margin-left: 10px">删除</el-button>
            </template>
          </el-popconfirm>
        </template>
      </el-table-column>
    </el-table>

    <div style="margin: 10px 0">
      <el-pagination
          @size-change="handleSizeChange"
          @current-change="handleCurrentChange"
          :current-page="currentPage"
          :page-sizes="[5, 10, 20]"
          :page-size="pageSize"
          layout="total, sizes, prev, pager, next, jumper"
          :total="total">
      </el-pagination>
    </div>

    <el-dialog title="提示" :visible.sync="dialogVisible" width="30%">
      <el-form :model="form" label-width="120px">
        <el-form-item label="名称">
          <el-input v-model="form.name" style="width: 80%"></el-input>
        </el-form-item>
        <el-form-item label="路径">
          <el-input v-model="form.path" style="width: 80%"></el-input>
        </el-form-item>
        <el-form-item label="备注">
          <el-input v-model="form.comment" style="width: 80%"></el-input>
        </el-form-item>
        <el-form-item label="图标">
          <el-input v-model="form.icon" style="width: 80%"></el-input>
        </el-form-item>
      </el-form>
      <template #footer>
          <span class="dialog-footer">
            <el-button @click="dialogVisible = false">取 消</el-button>
            <el-button type="primary" @click="save">确 定</el-button>
          </span>
      </template>
    </el-dialog>

  </div>
</template>

<script>
import request from "@/utils/request";
export default {
  name: 'Permission',
  components: {},
  data() {
    return {
      loading: true,
      form: {},
      dialogVisible: false,
      search: '',
      currentPage: 1,
      pageSize: 10,
      total: 0,
      tableData: [],
    }
  },
  created() {
    this.load()
  },
  methods: {
    load() {
      this.loading = true
      request.get("/permission", {
        params: {
          pageNum: this.currentPage,
          pageSize: this.pageSize,
          search: this.search
        }
      }).then(res => {
        this.loading = false
        this.tableData = res.data.records
        this.total = res.data.total
      })
    },
    add() {
      this.dialogVisible = true
      this.form = {}
    },
    save() {
      if (this.form.id) {  // 更新
        request.put("/permission", this.form).then(res => {
          console.log(res)
          if (res.code === '0') {
            this.$message({
              type: "success",
              message: "更新成功"
            })
          } else {
            this.$message({
              type: "error",
              message: res.msg
            })
          }
          this.load() // 刷新表格的数据
          this.dialogVisible = false  // 关闭弹窗
        })
      } else {  // 新增
        let userStr = sessionStorage.getItem("user") || "{}"
        let user = JSON.parse(userStr)
        this.form.author = user.nickName
        request.post("/permission", this.form).then(res => {
          console.log(res)
          if (res.code === '0') {
            this.$message({
              type: "success",
              message: "新增成功"
            })
          } else {
            this.$message({
              type: "error",
              message: res.msg
            })
          }
          this.load() // 刷新表格的数据
          this.dialogVisible = false  // 关闭弹窗
        })
      }
    },
    handleEdit(row) {
      this.form = JSON.parse(JSON.stringify(row))
      this.dialogVisible = true
    },
    handleDelete(id) {
      console.log(id)
      request.delete("/permission/" + id).then(res => {
        if (res.code === '0') {
          this.$message({
            type: "success",
            message: "删除成功"
          })
        } else {
          this.$message({
            type: "error",
            message: res.msg
          })
        }
        this.load()  // 删除之后重新加载表格的数据
      })
    },
    handleSizeChange(pageSize) {   // 改变当前每页的个数触发
      this.pageSize = pageSize
      this.load()
    },
    handleCurrentChange(pageNum) {  // 改变当前页码触发
      this.currentPage = pageNum
      this.load()
    }
  }
}
</script>
Role页面
<template>
  <div style="padding: 10px">
    <!--    功能区域-->
    <div style="margin: 10px 0">
      <el-button type="primary" @click="add">新增</el-button>
    </div>

    <!--    搜索区域-->
    <div style="margin: 10px 0">
      <el-input v-model="search" placeholder="请输入关键字" style="width: 20%" clearable></el-input>
      <el-button type="primary" style="margin-left: 5px" @click="load">查询</el-button>
    </div>
    <el-table
        v-loading="loading"
        :data="tableData"
        border
        stripe
        style="width: 100%">
      <el-table-column
          prop="id"
          label="ID"
          sortable
          width="80"
      >
      </el-table-column>
      <el-table-column
          prop="name"
          label="名称">
      </el-table-column>
      <el-table-column
          prop="comment"
          label="备注">
      </el-table-column>
      <el-table-column label="权限菜单">
        <template #default="scope">
          <el-select clearable v-model="scope.row.permissions" multiple placeholder="请选择" style="width: 80%">
            <el-option v-for="item in permissions" :key="item.id" :label="item.comment" :value="item.id"></el-option>
          </el-select>
        </template>
      </el-table-column>
      <el-table-column label="操作">
        <template #default="scope">
          <el-button size="mini" type="primary" @click="handleChange(scope.row)">保存权限菜单</el-button>
          <el-button size="mini" @click="handleEdit(scope.row)">编辑</el-button>
          <el-popconfirm title="确定删除吗?" @confirm="handleDelete(scope.row.id)">
            <template #reference>
              <el-button size="mini" type="danger" style="margin-left: 10px">删除</el-button>
            </template>
          </el-popconfirm>
        </template>
      </el-table-column>
    </el-table>

    <div style="margin: 10px 0">
      <el-pagination
          @size-change="handleSizeChange"
          @current-change="handleCurrentChange"
          :current-page="currentPage"
          :page-sizes="[5, 10, 20]"
          :page-size="pageSize"
          layout="total, sizes, prev, pager, next, jumper"
          :total="total">
      </el-pagination>
    </div>

    <el-dialog title="提示" :visible.sync="dialogVisible" width="30%">
      <el-form :model="form" label-width="120px">
        <el-form-item label="名称">
          <el-input v-model="form.name" style="width: 80%"></el-input>
        </el-form-item>
        <el-form-item label="备注">
          <el-input v-model="form.comment" style="width: 80%"></el-input>
        </el-form-item>
      </el-form>
      <template #footer>
          <span class="dialog-footer">
            <el-button @click="dialogVisible = false">取 消</el-button>
            <el-button type="primary" @click="save">确 定</el-button>
          </span>
      </template>
    </el-dialog>

  </div>
</template>

<script>
import request from "@/utils/request";
export default {
  name: 'Role',
  components: {},
  data() {
    return {
      loading: true,
      form: {},
      dialogVisible: false,
      search: '',
      currentPage: 1,
      pageSize: 10,
      total: 0,
      tableData: [],
      permissions: []
    }
  },
  created() {
    this.load()
  },
  methods: {
    handleChange(row) {
      request.put("/role/changePermission", row).then(res => {
        if (res.code === '0') {
          this.$message.success("更新成功")
          if (res.data) {
            this.$router.push("/login")
          }
        }
      })
    },
    load() {
      this.loading = true
      request.get("/role", {
        params: {
          pageNum: this.currentPage,
          pageSize: this.pageSize,
          search: this.search
        }
      }).then(res => {
        this.loading = false
        this.tableData = res.data.records
        this.total = res.data.total
      })
      request.get("/permission/all").then(res => {
        this.permissions = res.data
      })
    },
    add() {
      this.dialogVisible = true
      this.form = {}
    },
    save() {
      if (this.form.id) {  // 更新
        request.put("/role", this.form).then(res => {
          console.log(res)
          if (res.code === '0') {
            this.$message({
              type: "success",
              message: "更新成功"
            })
          } else {
            this.$message({
              type: "error",
              message: res.msg
            })
          }
          this.load() // 刷新表格的数据
          this.dialogVisible = false  // 关闭弹窗
        })
      } else {  // 新增
        let userStr = sessionStorage.getItem("user") || "{}"
        let user = JSON.parse(userStr)
        this.form.author = user.nickName
        request.post("/role", this.form).then(res => {
          console.log(res)
          if (res.code === '0') {
            this.$message({
              type: "success",
              message: "新增成功"
            })
          } else {
            this.$message({
              type: "error",
              message: res.msg
            })
          }
          this.load() // 刷新表格的数据
          this.dialogVisible = false  // 关闭弹窗
        })
      }
    },
    handleEdit(row) {
      this.form = JSON.parse(JSON.stringify(row))
      this.dialogVisible = true
    },
    handleDelete(id) {
      console.log(id)
      request.delete("/role/" + id).then(res => {
        if (res.code === '0') {
          this.$message({
            type: "success",
            message: "删除成功"
          })
        } else {
          this.$message({
            type: "error",
            message: res.msg
          })
        }
        this.load()  // 删除之后重新加载表格的数据
      })
    },
    handleSizeChange(pageSize) {   // 改变当前每页的个数触发
      this.pageSize = pageSize
      this.load()
    },
    handleCurrentChange(pageNum) {  // 改变当前页码触发
      this.currentPage = pageNum
      this.load()
    }
  }
}
</script>
修改User页面引用后端role数据
删除原普通用户span
替换为以下代码
<el-table-column label="角色列表" width="300">
        <template #default="scope">
          <el-select v-model="scope.row.roles" multiple placeholder="请选择" style="width: 80%">
            <el-option v-for="item in roles" :key="item.id" :label="item.comment" :value="item.id"></el-option>
          </el-select>
    		</template>
      </el-table-column>
新增实参
roles: []
改变权限的方法
 handleChange(row) {
      request.put("/user/changeRole", row).then(res => {
        if (res.code === '0') {
          this.$message.success("更新成功")
          if (res.data) {
            this.$router.push("/login")
          }
        }
      })
    },

load() {
      request.get("/user",{
        params: {
          pageNum: this.currentPage,
          pageSize: this.pageSize,
          search: this.search
        }
      }).then(res => {
        console.log(res)
        this.tableData = res.data.records
        this.total = res.data.total
        this.loading = false
      })
+      request.get("/role/all").then(res => {
+        this.roles = res.data
+      })
    },
SpringBoot后端
初始化项目
下载一个SpringBoot初始项目
引入依赖
- Lombok
- Mybatis
- MySQL Drive
- Java Web
尝试启动项目
maven引入Mybatisplus插件
<dependency>
    <groupId>com.baomidou</groupId>
    <artifactId>mybatis-plus-boot-starter</artifactId>
    <version>3.5.1</version>
</dependency>
在Applicationrun同级目录下新建目录为common,负责存放工具类
编写配置文件及工具类
编写Application.properties文件配置MySQL驱动及MP驱动
server.port=9090
spring.datasource.driver-class-name=com.mysql.cj.jdbc.Driver
spring.datasource.username=root
spring.datasource.password=[you mysql password]
spring.datasource.url=jdbc:mysql://localhost:3306/springboot-vue?useUnicode=true&characterEncoding=UTF-8&serverTimezone=UTC
mybatis-plus.configuration.map-underscore-to-camel-case = false
新建MybatisPlusConfig工具类
import com.baomidou.mybatisplus.annotation.DbType;
import com.baomidou.mybatisplus.extension.plugins.MybatisPlusInterceptor;
//import com.baomidou.mybatisplus.extension.plugins.PaginationInterceptor;
import com.baomidou.mybatisplus.extension.plugins.inner.PaginationInnerInterceptor;
import org.mybatis.spring.annotation.MapperScan;
import org.springframework.context.annotation.Bean;
import org.springframework.context.annotation.Configuration;

@Configuration
@MapperScan("com.sagamiyun.springbootproject.mapper")
public class MybatisPlusConfig {

    /**
     * 分页插件
     */

//    旧版Mybatisplus
//    @Bean
//    public PaginationInterceptor paginationInterceptor() { return new PaginationInterceptor(); }

    @Bean
    public MybatisPlusInterceptor mybatisPlusInterceptor(){
        MybatisPlusInterceptor interceptor = new MybatisPlusInterceptor();
        interceptor.addInnerInterceptor(new PaginationInnerInterceptor(DbType.MYSQL));
        return interceptor;
    }
}
编写与前台传递控制参数的Result类
新建Result类
import lombok.Data;
import lombok.NoArgsConstructor;

@Data
@NoArgsConstructor
@AllArgsConstructor
public class Result<T> {
    private String code;
    private String msg;
    private T data;

    public Result(T data) {
        this.data = data;
    }

    public static Result success() {
        Result result = new Result<>();
        result.setCode("0");
        result.setMsg("成功");
        return result;
    }

    public static <T> Result<T> success(T data) {
        Result<T> result = new Result<>(data);
        result.setCode("0");
        result.setMsg("成功");
        return result;
    }
}
编写Controller层接口
创建Controller层的UserController类
import com.sagamiyun.springbootproject.common.Result;
import org.springframework.web.bind.annotation.PostMapping;
import org.springframework.web.bind.annotation.RequestMapping;
import org.springframework.web.bind.annotation.RestController;

@RestController
@RequestMapping("/user")
public class UserController {

    @PostMapping("/")
    public Result save(@){

    }
}
创建实体类
创建entity层(pojo层)的User类
import com.baomidou.mybatisplus.annotation.IdType;
import com.baomidou.mybatisplus.annotation.TableId;
import com.baomidou.mybatisplus.annotation.TableName;
import lombok.AllArgsConstructor;
import lombok.Data;
import lombok.NoArgsConstructor;

//TableName此注释用于映射数据库中表的名字
@TableName("user")
@Data
@AllArgsConstructor
@NoArgsConstructor
public class User {

    @TableId(value = "id",type = IdType.AUTO)       //绑定ID并自增
    private Integer id;

    private String username ;
    private String password;
    private Integer age;
    private String sex;
    private String address ;

}
创建Mapper层(dao层)的UserMapper接口
该接口负责继承MybatisPlus的BaseMapper接口以实现系映射转换为 Mybatis 内部对象注入容器
public interface UserMapper extends BaseMapper<User> {

}
注意!此项目将Controller层当做Server层使用,不符合SpringBoot项目规范
引入Hutool工具包
<dependency>
    <groupId>cn.hutool</groupId>
    <artifactId>hutool-all</artifactId>
    <version>5.8.0.M2</version>
</dependency>
完善后端服务接口及方法
继续编写UserController类
    @PostMapping
    public Result save(@RequestBody User user){
        if (user.getPassword()==null){
            user.setPassword("123456");
        }
        userMapper.insert(user);
        return Result.success();
    }

    @GetMapping
    public Result findPage(@RequestParam(defaultValue = "1") Integer pageNum,
                           @RequestParam(defaultValue = "10") Integer pageSize,
                           @RequestParam(defaultValue = "") String search){
        LambdaQueryWrapper<User> wrapper = Wrappers.<User>lambdaQuery();	//Wrappers为MP的Lamda编程
        if(StrUtil.isNotBlank(search)){
            wrapper.like(User::getUsername,search);
        }
        Page<User> userPage = userMapper.selectPage(new Page<>(pageNum, pageSize), wrapper);

        return Result.success(userPage);
    }
编写Delete方法和Update方法
    @PutMapping
    public Result<?> update(@RequestBody User user){
        userMapper.updateById(user);
        return Result.success();
    }


	@DeleteMapping("/{id}")
    public Result<?> delete(@PathVariable Long id){
        userMapper.deleteById(id);
        return Result.success();
    }
编写注册方法
    @PostMapping("/register")
    public Result<?> register(@RequestBody User user){
        User res = userMapper.selectOne(Wrappers.<User>lambdaQuery()
                .eq(User::getUsername, user.getUsername()));
        if(res!=null){
            return Result.error("-1","用户名重复");
        }
        if(user.getPassword()==null){
            user.setPassword("123456");
        }
        userMapper.insert(user);
        return Result.success();
    }
新建图书属性实体类及实现方法
创建有关图书管理的增删改查方法,JavaBean及Mapper接口
import cn.hutool.core.util.StrUtil;
import com.baomidou.mybatisplus.core.conditions.query.LambdaQueryWrapper;
import com.baomidou.mybatisplus.core.toolkit.Wrappers;
import com.baomidou.mybatisplus.extension.plugins.pagination.Page;
import com.sagamiyun.springbootproject.common.Result;
import com.sagamiyun.springbootproject.entity.Book;
import com.sagamiyun.springbootproject.mapper.BookMapper;
import org.springframework.web.bind.annotation.*;

import javax.annotation.Resource;


@RestController
@RequestMapping("/book")
@CrossOrigin(origins = "*")
public class BookController {

    // Resource注解负责将Mapper引入
    @Resource
    BookMapper bookMapper;

    // RequestBody此注解的含义为将Json文件转换成Java对象
    @PostMapping
    public Result save(@RequestBody Book book){
        bookMapper.insert(book);
        return Result.success();
    }


    @PutMapping
    public Result<?> update(@RequestBody Book book){
        bookMapper.updateById(book);
        return Result.success();
    }

    @DeleteMapping("/{id}")
    public Result<?> delete(@PathVariable Long id){
        bookMapper.deleteById(id);
        return Result.success();
    }

    @GetMapping
    public Result findPage(@RequestParam(defaultValue = "1") Integer pageNum,
                           @RequestParam(defaultValue = "10") Integer pageSize,
                           @RequestParam(defaultValue = "") String search){
        LambdaQueryWrapper<Book> wrapper = Wrappers.<Book>lambdaQuery();
        if(StrUtil.isNotBlank(search)){
            wrapper.like(Book::getName,search);
        }
        Page<Book> bookPage = bookMapper.selectPage(new Page<>(pageNum, pageSize), wrapper);
        return Result.success(bookPage);
    }
}
import com.baomidou.mybatisplus.core.mapper.BaseMapper;
import com.sagamiyun.springbootproject.entity.Book;
import com.sagamiyun.springbootproject.entity.User;

public interface BookMapper extends BaseMapper<Book> {

}
import com.baomidou.mybatisplus.annotation.IdType;
import com.baomidou.mybatisplus.annotation.TableId;
import com.baomidou.mybatisplus.annotation.TableName;
import lombok.Data;

import java.math.BigDecimal;
import java.util.Date;

//TableName此注释用于映射数据库中表的名字
@TableName("book")
@Data
public class Book {

    @TableId(type = IdType.AUTO)       //绑定ID并自增
    private Integer id;
    private String name ;
    private BigDecimal price;
    private String author;
    @JsonFormat(pattern = "yyyy-MM-dd", timezone = "GMT+8")
    private Date createTime;

}
实现文件上传的接口
新建FileController的上传方法
    @Value("${server.port}")
    private String port;

    private static final String ip = "http://localhost";

    @PostMapping("/upload")
    public Result<?> upload(@RequestPart("file") MultipartFile file) throws IOException {
        String originalFilename = file.getOriginalFilename();  // 获取源文件的名称
        // 定义文件的唯一标识(前缀)
        String flag = IdUtil.fastSimpleUUID();
        String rootFilePath = System.getProperty("user.dir") + "/src/main/resources/files/" + flag + "_" + originalFilename;  // 																												获取上传的路径
        FileUtil.writeBytes(file.getBytes(), rootFilePath);  // 把文件写入到上传的路径
        return Result.success(ip + ":" + port + "/files/" + flag);  // 返回结果 url
    }
新建resource文件夹下的files文件夹用于存放上传文件路径
实现副文本编辑器的实体类,Mapper和Controller
import com.baomidou.mybatisplus.annotation.IdType;
import com.baomidou.mybatisplus.annotation.TableId;
import com.baomidou.mybatisplus.annotation.TableName;
import com.fasterxml.jackson.annotation.JsonFormat;
import lombok.Data;

import java.util.Date;

@TableName("news")
@Data
public class News {

    @TableId(type = IdType.AUTO)
    private Integer id;
    private String title;
    private String content;
    private String author;

    @JsonFormat(pattern = "yyyy-MM-dd", timezone = "GMT+8")
    private Date time;
}
import com.baomidou.mybatisplus.core.mapper.BaseMapper;

public interface NewsMapper extends BaseMapper<News> {

}
import cn.hutool.core.util.StrUtil;
import com.baomidou.mybatisplus.core.conditions.query.LambdaQueryWrapper;
import com.baomidou.mybatisplus.core.toolkit.Wrappers;
import com.baomidou.mybatisplus.extension.plugins.pagination.Page;
import org.springframework.web.bind.annotation.*;

import javax.annotation.Resource;


@RestController
@RequestMapping("/news")
@CrossOrigin(origins = "*")
public class NewsController {

    // Resource注解负责将Mapper引入
    @Resource
    NewsMapper newsMapper;

    // RequestBody此注解的含义为将Json文件转换成Java对象
    @PostMapping
    public Result save(@RequestBody News news){
        newsMapper.insert(news);
        return Result.success();
    }


    @PutMapping
    public Result<?> update(@RequestBody News news){
        newsMapper.updateById(news);
        return Result.success();
    }

    @DeleteMapping("/{id}")
    public Result<?> delete(@PathVariable Long id){
        newsMapper.deleteById(id);
        return Result.success();
    }

    @GetMapping("/{id}")
    public Result<?> getById(@PathVariable Long id){
        return Result.success(newsMapper.selectById(id));
    }

    @GetMapping
    public Result findPage(@RequestParam(defaultValue = "1") Integer pageNum,
                           @RequestParam(defaultValue = "10") Integer pageSize,
                           @RequestParam(defaultValue = "") String search){
        LambdaQueryWrapper<News> wrapper = Wrappers.<News>lambdaQuery();
        if(StrUtil.isNotBlank(search)){
            wrapper.like(News::getTitle,search);
         }
        Page<News> newsPage = newsMapper.selectPage(new Page<>(pageNum, pageSize), wrapper);
        return Result.success(newsPage);
    }
}
富文本编辑器上传接口
    @PostMapping("/editor/upload")
    public JSON editorUpload(@RequestPart("file") MultipartFile file) throws IOException {
        String originalFilename = file.getOriginalFilename();  // 获取源文件的名称
        // 定义文件的唯一标识(前缀)
        String flag = IdUtil.fastSimpleUUID();
        String rootFilePath = System.getProperty("user.dir") + "/src/main/resources/files/" + flag + "_" + originalFilename;  // 获取上传的路径
        FileUtil.writeBytes(file.getBytes(), rootFilePath);  // 把文件写入到上传的路径
        String url = ip + ":" + port + "/files/" + flag;  // 返回结果 url


        JSONObject json = new JSONObject();				//封装副文本编辑器的JSON格式
        json.set("errno", 0);
        JSONArray arr = new JSONArray();
        JSONObject data = new JSONObject();
        arr.add(data);
        data.set("url", url);
        json.set("data", arr);

        return json;  // 返回结果 url
    }
千万要看清该接口方法的jsonset值为errno而不是error
实现访问控制
我们新建User表中的role属性,并在对应的JavaBean中增添该属性
为保证网页安全性我们在后端UserController中新增一个接口负责返回role类型来进行判断
    @GetMapping("/{id}")
    public Result<?> getById(@PathVariable Long id) {
        return Result.success(userMapper.selectById(id));
    }
实现一对多及多对一查询
在resource目录下新建mapper文件夹用于存放MybatisMapper
新建Book.xml,内容如下
<?xml version="1.0" encoding="UTF-8"?>
<!DOCTYPE mapper PUBLIC "-//mybatis.org//DTD Mapper 3.0//EN"
        "http://mybatis.org/dtd/mybatis-3-mapper.dtd">
<mapper namespace="com.[you packagename].mapper.BookMapper">
    <select id="findByUserId" resultType="com.[you packagename].entity.Book">
        select `book`.*, `user`.nick_name
        from `book`
        left join `user` on `book`.user_id = `user`.id
        where `book`.user_id = #{userId}
    </select>

</mapper>
新建User.xml,内容如下
<?xml version="1.0" encoding="UTF-8"?>
<!DOCTYPE mapper PUBLIC "-//mybatis.org//DTD Mapper 3.0//EN"
        "http://mybatis.org/dtd/mybatis-3-mapper.dtd">
<mapper namespace="com.[you packagename].mapper.UserMapper">

    <resultMap id="userMap" type="com.[you packagename].entity.User">
        <result property="id" column="id"/>
        <result property="username" column="username"/>
        <result property="password" column="password"/>
        <result property="nickName" column="nick_name"/>
        <result property="age" column="age"/>
        <result property="sex" column="sex"/>
        <result property="address" column="address"/>
        <result property="avatar" column="avatar"/>
        <collection property="bookList" javaType="ArrayList" ofType="com.[you packagename].entity.Book">
            <result column="b_id" property="id" />
            <result column="b_name" property="name" />
            <result column="b_price" property="price" />
        </collection>
    </resultMap>

    <select id="findPage" resultMap="userMap">
        SELECT `user`.* ,book.id as b_id, book.name b_name,book.price b_price from `user`
        left join book on user.id = book.user_id where `user`.nick_name like concat('%', #{nickName}, '%')
    </select>
</mapper>
还要记住我们要在JavaBean中对应添加两个属性:
Book.java
	private Integer user_id;

    @TableField(exist = false)
    private String username;
User.java
    @TableField(exist = false)
    private List<Book> bookList;
@TableField该注解用于数据库中没有相对应的属性时所解决的方法
我们同时在SQLBook表中添加行元素:user_id
已更新SQL数据表
当然以上还有一些疏漏,我们可以查看版本号推送来查漏补缺
https://github.com/SagamiYun/SpringBoot-Vue-Demo/commit/06ee460bab8b7e7082389d17092d7ebcaded8c3b
实现文件导入导出
新增依赖
		<!--excel导出依赖-->
		<dependency>
			<groupId>org.apache.poi</groupId>
			<artifactId>poi-ooxml</artifactId>
			<version>4.1.2</version>
		</dependency>
在User类新增两个接口,内容如下
 /**
     * Excel导出
     * @param response
     * @throws IOException
     */
    @GetMapping("/export")
    public void export(HttpServletResponse response) throws IOException {

        List<Map<String, Object>> list = CollUtil.newArrayList();

        List<User> all = userMapper.selectList(null);
        for (User user : all) {
            Map<String, Object> row1 = new LinkedHashMap<>();
            row1.put("用户名", user.getUsername());
            row1.put("昵称", user.getNick_name());
            row1.put("年龄", user.getAge());
            row1.put("性别", user.getSex());
            row1.put("地址", user.getAddress());
            row1.put("角色", user.getRole());
            list.add(row1);
        }

        // 2. 写excel
        ExcelWriter writer = ExcelUtil.getWriter(true);
        writer.write(list, true);

        response.setContentType("application/vnd.openxmlformats-officedocument.spreadsheetml.sheet;charset=utf-8");
        String fileName = URLEncoder.encode("用户信息", "UTF-8");
        response.setHeader("Content-Disposition", "attachment;filename=" + fileName + ".xlsx");

        ServletOutputStream out = response.getOutputStream();
        writer.flush(out, true);
        writer.close();
        IoUtil.close(System.out);
    }

    /**
     * Excel导入
     * 导入的模板可以使用 Excel导出的文件
     * @param file Excel
     * @return
     * @throws IOException
     */
    @PostMapping("/import")
    public Result<?> upload(MultipartFile file) throws IOException {
        InputStream inputStream = file.getInputStream();
        List<List<Object>> lists = ExcelUtil.getReader(inputStream).read(1);
        List<User> saveList = new ArrayList<>();
        for (List<Object> row : lists) {
            User user = new User();
            user.setUsername(row.get(0).toString());
            user.setNick_name(row.get(1).toString());
            user.setAge(Integer.valueOf(row.get(2).toString()));
            user.setSex(row.get(3).toString());
            user.setAddress(row.get(4).toString());
            user.setRole(Integer.valueOf(row.get(5).toString()));
            saveList.add(user);
        }
        for (User user : saveList) {
            userMapper.insert(user);
        }
        return Result.success();
    }
书籍页面实现批量删除方法
在BookController新增接口
@PostMapping("/deleteBatch")
    public Result<?> deleteBatch(@RequestBody List<Integer> ids) {
        bookMapper.deleteBatchIds(ids);
        return Result.success();
    }
实现分类页面父子查询
CategoryController.java
import org.springframework.web.bind.annotation.*;

import javax.annotation.Resource;
import java.util.ArrayList;
import java.util.List;

@RestController
@RequestMapping("/category")
@CrossOrigin(origins = "*")
public class CategoryController {

    @Resource
    CategoryMapper CategoryMapper;

    @PostMapping
    public Result<?> save(@RequestBody Category Category) {
        CategoryMapper.insert(Category);
        return Result.success();
    }

    @PutMapping
    public Result<?> update(@RequestBody Category Category) {
        CategoryMapper.updateById(Category);
        return Result.success();
    }

    @DeleteMapping("/{id}")
    public Result<?> delete(@PathVariable Integer id) {
        CategoryMapper.deleteById(id);
        return Result.success();
    }

    @GetMapping("/{id}")
    public Result<?> getById(@PathVariable Integer id) {
        return Result.success(CategoryMapper.selectById(id));
    }

    /**
     * 分类父子查询
     * @return
     */
    @GetMapping
    public Result<?> getAll() {
        // 先查询所有的数据
        List<Category> allCategories = CategoryMapper.selectList(null);
        return Result.success(loopQuery(null, allCategories));
    }

    /**
     * 递归查询子集
     * @param pid
     * @param allCategories
     * @return
     */
    private List<Category> loopQuery(Integer pid, List<Category> allCategories) {
        List<Category> categoryList = new ArrayList<>();
        for (Category category : allCategories) {
            if (pid == null) {
                if (category.getPid() == null) {
                    categoryList.add(category);
                    category.setChildren(loopQuery(category.getId(), allCategories));
                }
            } else if (pid.equals(category.getPid())) {
                categoryList.add(category);
                category.setChildren(loopQuery(category.getId(), allCategories));
            }
        }
        return categoryList;
    }
}
Category.java
import com.baomidou.mybatisplus.annotation.IdType;
import com.baomidou.mybatisplus.annotation.TableField;
import com.baomidou.mybatisplus.annotation.TableId;
import com.baomidou.mybatisplus.annotation.TableName;
import lombok.Data;

import java.util.List;

@TableName("category")
@Data
public class Category {
    @TableId(type = IdType.AUTO)
    private Integer id;
    private String name;
    private Integer pid;

    @TableField(exist = false)
    private List<Category> children;
}
CategoryMapper.java
import com.baomidou.mybatisplus.core.mapper.BaseMapper;

public interface CategoryMapper extends BaseMapper<Category> {

}
该接口实现了对分类的递归查询,虽然使用了递归查询,但其仅使用一次递归来查询所有数据,故时间复杂度有所保证
增加Home页及Echart集成
集成支付宝支付
集成JWT与druid
pom引入
		<!--  JWT  -->
		<dependency>
			<groupId>com.auth0</groupId>
			<artifactId>java-jwt</artifactId>
			<version>3.4.0</version>
		</dependency>
		<!--德鲁伊连接池-->
        <dependency>
            <groupId>com.alibaba</groupId>
            <artifactId>druid</artifactId>
            <version>1.2.3</version>
        </dependency>
common文件夹
新建AuthInterceptor.java文件,代码如下(身份验证拦截器)
public class AuthInterceptor implements HandlerInterceptor {

    @Autowired
    private UserMapper userMapper;

    @Override
    public boolean preHandle(HttpServletRequest request, HttpServletResponse response, Object handler) throws Exception {
        String token = request.getHeader("token");
        if (StrUtil.isBlank(token)) {
            throw new CustomException("402", "未获取到token, 请重新登录");
        }
        Integer userId = Integer.valueOf(JWT.decode(token).getAudience().get(0));
        User user = userMapper.selectById(userId);
        if (user == null) {
            throw new CustomException("401", "token不合法");
        }
        // 验证 token
        JWTVerifier jwtVerifier = JWT.require(Algorithm.HMAC256(user.getPassword())).build();
        try {
            jwtVerifier.verify(token);
        } catch (Exception e) {
            throw new CustomException("401", "token不合法");
        }
        return true;
    }
}
新建WebConfig.java
@Configuration
public class WebConfig implements WebMvcConfigurer {

    @Override
    public void addInterceptors(InterceptorRegistry registry) {
        registry.addInterceptor(authInterceptor())
                .addPathPatterns("/**")
                .excludePathPatterns("/user/login", "/user/register");
    }

    @Bean
    public AuthInterceptor authInterceptor() {
        return new AuthInterceptor();
    }
}
Controller
BaseController.java
@RestController
public class BaseController {

    @Autowired
    private UserMapper userMapper;

    @Autowired
    private HttpServletRequest request;

    /**
     * 根据token获取用户信息
     * @return user
     */
    public User getUser() {
        String token = request.getHeader("token");
        String aud = JWT.decode(token).getAudience().get(0);
        Integer userId = Integer.valueOf(aud);
        return userMapper.selectById(userId);
    }
}
将BookController CategoryController FileController NewsController UserController 继承至 BaseController
同时修改UserController中login接口为以下
  @PostMapping("/login")
    public Result<?> login(@RequestBody User user){
        User res = userMapper.selectOne(Wrappers.<User>lambdaQuery()
                .eq(User::getUsername, user.getUsername())
                .eq(User::getPassword, user.getPassword()));
        if(res==null){
            return Result.error("-1","用户名或密码错误");
        }

        String token = TokenUtils.genToken(res);
        res.setToken(token);
        return Result.success(res);
    }
我这里使用的是原生的方法来进行token生成,作者的源码使用的是QueryWrapper消息队列来实现对请求的处理,但我通过Debug发现无法正常获取到User,
故这里使用了MP的原生方法来进行对象属性生成(这里我排错排了将近半天)
User实体类添加token属性
    @TableField(exist = false)
    private String token;
exception
新增CustomException类,用来自定义抛出异常
public class CustomException extends RuntimeException {
    private String code;
    private String msg;

    public CustomException(String code, String msg) {
        this.code = code;
        this.msg = msg;
    }

    public String getCode() {
        return code;
    }

    public String getMsg() {
        return msg;
    }
}
GlobalExceptionHandler 类中新增处理token异常方法
  //统一异常处理@ExceptionHandler,主要用于Exception
    @ExceptionHandler(CustomException.class)
    @ResponseBody//返回json串
    public Result<?> customer(HttpServletRequest request, CustomException e) {
        log.error("异常信息:", e);
        return Result.error(e.getCode(), e.getMsg());
    }
utils
新增TokenUtils工具包,内容如下
@Slf4j
@Component
public class TokenUtils {

    @Autowired
    private UserMapper userMapper;

    private static UserMapper staticUserMapper;

    @PostConstruct
    public void init() {
        staticUserMapper = userMapper;
    }

    /**
     * 生成token
     * @param user
     * @return
     */
    public static String genToken(User user) {
        return JWT.create().withExpiresAt(DateUtil.offsetDay(new Date(), 1)).withAudience(user.getId().toString())
                .sign(Algorithm.HMAC256(user.getPassword()));
    }

    /**
     * 获取token中的用户信息
     * @return
     */
    public static User getUser() {
        try {
            HttpServletRequest request = ((ServletRequestAttributes) RequestContextHolder.getRequestAttributes()).getRequest();
            String token = request.getHeader("token");
            String aud = JWT.decode(token).getAudience().get(0);
            Integer userId = Integer.valueOf(aud);
            return staticUserMapper.selectById(userId);
        } catch (Exception e) {
            log.error("解析token失败", e);
            return null;
        }
    }
}
application.properties
新增德鲁伊连接池,上传限制,slf4j引入
spring.datasource.type=com.alibaba.druid.pool.DruidDataSource

# \u6587\u4EF6\u4E0A\u4F20\u7684\u4E0A\u9650
spring.servlet.multipart.max-file-size=100MB

# mybatis-plus \u5F00\u542Fsql\u65E5\u5FD7

mybatis-plus.configuration.log-impl=org.apache.ibatis.logging.slf4j.Slf4jImpl
集成聊天室
引入依赖
		<!-- websocket -->
		<dependency>
			<groupId>org.springframework.boot</groupId>
			<artifactId>spring-boot-starter-websocket</artifactId>
		</dependency>
在身份拦截器(AuthInterceptor)preHandle方法中加入
 public boolean preHandle(HttpServletRequest request, HttpServletResponse response, Object handler) throws Exception {

        String servletPath = request.getServletPath();
        System.out.println(servletPath);
     ...
     }
新增config工具包
CorsConfig解决跨域问题
import org.springframework.context.annotation.Bean;
import org.springframework.context.annotation.Configuration;
import org.springframework.web.cors.CorsConfiguration;
import org.springframework.web.cors.UrlBasedCorsConfigurationSource;
import org.springframework.web.filter.CorsFilter;

@Configuration
public class CorsConfig {

    // 当前跨域请求最大有效时长。这里默认1天
    private static final long MAX_AGE = 24 * 60 * 60;

    private CorsConfiguration buildConfig() {
        CorsConfiguration corsConfiguration = new CorsConfiguration();
        corsConfiguration.addAllowedOrigin("*"); // 1 设置访问源地址
        corsConfiguration.addAllowedHeader("*"); // 2 设置访问源请求头
        corsConfiguration.addAllowedMethod("*"); // 3 设置访问源请求方法
        corsConfiguration.setMaxAge(MAX_AGE);
        return corsConfiguration;
    }

    @Bean
    public CorsFilter corsFilter() {
        UrlBasedCorsConfigurationSource source = new UrlBasedCorsConfigurationSource();
        source.registerCorsConfiguration("/**", buildConfig()); // 4 对接口配置跨域设置
        return new CorsFilter(source);
    }
}
将原项目Controller层所有类的@CrossOrigin(origins = “*”)去掉
将WebConfig,MybatisPlusConfig重构至该文件夹
具体细节请参照版本推送
新增WebSocketConfig类
import org.springframework.context.annotation.Bean;
import org.springframework.context.annotation.Configuration;
import org.springframework.web.socket.server.standard.ServerEndpointExporter;

@Configuration
public class WebSocketConfig {

    /**
     * 注入一个ServerEndpointExporter,该Bean会自动注册使用@ServerEndpoint注解申明的websocket endpoint
     */
    @Bean
    public ServerEndpointExporter serverEndpointExporter() {
        return new ServerEndpointExporter();
    }

}
新增component软件包
新增WebSocketServer.java类,内容如下
import cn.hutool.json.JSONArray;
import cn.hutool.json.JSONObject;
import cn.hutool.json.JSONUtil;
import org.slf4j.Logger;
import org.slf4j.LoggerFactory;
import org.springframework.stereotype.Component;

import javax.websocket.*;
import javax.websocket.server.PathParam;
import javax.websocket.server.ServerEndpoint;
import java.util.Map;
import java.util.concurrent.ConcurrentHashMap;


/**
 * @author websocket服务
 */
@ServerEndpoint(value = "/imserver/{username}")
@Component
public class WebSocketServer {

    private static final Logger log = LoggerFactory.getLogger(WebSocketServer.class);

    /**
     * 记录当前在线连接数
     */
    public static final Map<String, Session> sessionMap = new ConcurrentHashMap<>();

    /**
     * 连接建立成功调用的方法
     */
    @OnOpen
    public void onOpen(Session session, @PathParam("username") String username) {
        sessionMap.put(username, session);
        log.info("有新用户加入,username={}, 当前在线人数为:{}", username, sessionMap.size());
        JSONObject result = new JSONObject();
        JSONArray array = new JSONArray();
        result.set("users", array);
        for (Object key : sessionMap.keySet()) {
            JSONObject jsonObject = new JSONObject();
            jsonObject.set("username", key);
            array.add(jsonObject);
        }
        sendAllMessage(JSONUtil.toJsonStr(result));
    }

    /**
     * 连接关闭调用的方法
     */
    @OnClose
    public void onClose(Session session, @PathParam("username") String username) {
        sessionMap.remove(username);
        log.info("有一连接关闭,移除username={}的用户session, 当前在线人数为:{}", username, sessionMap.size());
    }

    /**
     * 收到客户端消息后调用的方法
     *
     * @param message 客户端发送过来的消息
     */
    @OnMessage
    public void onMessage(String message, Session session, @PathParam("username") String username) {
        log.info("服务端收到用户username={}的消息:{}", username, message);
        JSONObject obj = JSONUtil.parseObj(message);
        String toUsername = obj.getStr("to");
        String text = obj.getStr("text");
        Session toSession = sessionMap.get(toUsername);
        if (toSession != null) {
            JSONObject jsonObject = new JSONObject();
            jsonObject.set("from", username);
            jsonObject.set("text", text);
            this.sendMessage(jsonObject.toString(), toSession);
            log.info("发送给用户username={},消息:{}", toUsername, jsonObject.toString());
        } else {
            log.info("发送失败,未找到用户username={}的session", toUsername);
        }
    }

    @OnError
    public void onError(Session session, Throwable error) {
        log.error("发生错误");
        error.printStackTrace();
    }

    /**
     * 服务端发送消息给客户端
     */
    private void sendMessage(String message, Session toSession) {
        try {
            log.info("服务端给客户端[{}]发送消息{}", toSession.getId(), message);
            toSession.getBasicRemote().sendText(message);
        } catch (Exception e) {
            log.error("服务端发送消息给客户端失败", e);
        }
    }

    /**
     * 服务端发送消息给所有客户端
     */
    private void sendAllMessage(String message) {
        try {
            for (Session session : sessionMap.values()) {
                log.info("服务端给客户端[{}]发送消息{}", session.getId(), message);
                session.getBasicRemote().sendText(message);
            }
        } catch (Exception e) {
            log.error("服务端发送消息给客户端失败", e);
        }
    }
}
集成头像
WebConfig新增头像修改路径
.excludePathPatterns("/user/login", "/user/register", "/imserver/**", "/files/**");
JavavBean(User)新增avatar属性
private String avatar;
已更新SQL
集成留言板功能
RBAC权限模型(一阶段)
UserController类中替换对应方法内容
	@Resource
    RoleMapper roleMapper;
    @Resource
    PermissionMapper permissionMapper;

@PostMapping("/login")
    public Result<?> login(@RequestBody User userParam) {
        QueryWrapper<User> queryWrapper = new QueryWrapper<>();
        queryWrapper.eq("username", userParam.getUsername());
        queryWrapper.eq("password", userParam.getPassword());
        User res = userMapper.selectOne(queryWrapper);
        if (res == null) {
            return Result.error("-1", "用户名或密码错误");
        }
        User res = userMapper.selectOne(queryWrapper);
        if (res == null) {
            return Result.error("-1", "用户名或密码错误");
        }
        HashSet<Permission> permissionSet = new HashSet<>();
        // 1. 从user_role表通过用户id查询所有的角色信息
        Integer userId = res.getId();
        List<UserRole> userRoles = roleMapper.getUserRoleByUserId(userId);
        for (UserRole userRole : userRoles) {
            // 2.根据roleId从role_permission表查询出所有的permissionId
            List<RolePermission> rolePermissions = permissionMapper.getRolePermissionByRoleId(userRole.getRoleId());
            for (RolePermission rolePermission : rolePermissions) {
                Integer permissionId = rolePermission.getPermissionId();
                // 3. 根据permissionId查询permission信息
                Permission permission = permissionMapper.selectById(permissionId);
                permissionSet.add(permission);
            }
        }
        res.setPermissions(permissionSet);

        // 生成token
        String token = TokenUtils.genToken(res);
        res.setToken(token);
        return Result.success(res);
    }

    @PostMapping("/register")
    public Result<?> register(@RequestBody User user) {
        User res = userMapper.selectOne(Wrappers.<User>lambdaQuery().eq(User::getUsername, user.getUsername()));
        if (res != null) {
            return Result.error("-1", "用户名重复");
        }
        if (user.getPassword() == null) {
            user.setPassword("123456");
        }
         userMapper.insert(user);
        return Result.success();
    }
删除掉有关User类的所有role方法
新增实体类Permission Role RolePermission UserRole
Permission
import com.baomidou.mybatisplus.annotation.IdType;
import com.baomidou.mybatisplus.annotation.TableId;
import com.baomidou.mybatisplus.annotation.TableName;
import lombok.Data;

import java.util.Objects;

@TableName("permission")
@Data
public class Permission {
    @TableId(type = IdType.AUTO)
    private Integer id;
    private String name;
    private String path;
    private String comment;

    @Override
    public boolean equals(Object o) {
        if (this == o) return true;
        if (o == null || getClass() != o.getClass()) return false;
        Permission that = (Permission) o;
        return path.equals(that.path);
    }

    @Override
    public int hashCode() {
        return Objects.hash(path);
    }
}
Role
import com.baomidou.mybatisplus.annotation.IdType;
import com.baomidou.mybatisplus.annotation.TableId;
import com.baomidou.mybatisplus.annotation.TableName;
import lombok.Data;

@TableName("role")
@Data
public class Role {
    @TableId(type = IdType.AUTO)
    private Integer id;
    private String name;
    private String comment;
}
RolePermission
import lombok.Data;

@Data
public class RolePermission {
    private Integer role_id;
    private Integer permission_id;
}
UserRole
import lombok.Data;

@Data
public class UserRole {
    private Integer user_id;
    private Integer role_id;
}
新增Mapper:PermissionMapper RoleMapper
PermissionMapper
import com.baomidou.mybatisplus.core.mapper.BaseMapper;
import org.apache.ibatis.annotations.Select;

import java.util.List;

public interface PermissionMapper extends BaseMapper<Permission> {

    @Select("select * from role_permission where role_id = #{role_id}")
    List<RolePermission> getRolePermissionByRole_id(Integer role_id);

}
RoleMapper
import org.apache.ibatis.annotations.Select;
import com.baomidou.mybatisplus.core.mapper.BaseMapper;

import java.util.List;

public interface RoleMapper extends BaseMapper<Role> {

    @Select("select * from user_role where user_id = #{user_id}")
    List<UserRole> getUserRoleByUser_id(Integer user_id);


}
动态路由
请根据自身情况调整对应代码
PermissionController
import org.springframework.web.bind.annotation.GetMapping;
import org.springframework.web.bind.annotation.PathVariable;
import org.springframework.web.bind.annotation.RequestMapping;
import org.springframework.web.bind.annotation.RestController;

import javax.annotation.Resource;
import java.util.HashSet;
import java.util.List;
import java.util.Set;

@RestController
@RequestMapping("/permission")
public class PermissionController extends BaseController {

    @Resource
    RoleMapper roleMapper;
    @Resource
    PermissionMapper permissionMapper;


    @GetMapping("/{userId}")
    public Result<Set<Permission>> all(@PathVariable("userId") Integer userId) {
        HashSet<Permission> permissionSet = new HashSet<>();
        List<UserRole> userRoles = roleMapper.getUserRoleByUserId(userId);
        for (UserRole userRole : userRoles) {
            // 2.根据roleId从role_permission表查询出所有的permissionId
            List<RolePermission> rolePermissions = permissionMapper.getRolePermissionByRoleId(userRole.getRole_id());
            for (RolePermission rolePermission : rolePermissions) {
                Integer permissionId = rolePermission.getPermission_id();
                // 3. 根据permissionId查询permission信息
                Permission permission = permissionMapper.selectById(permissionId);
                permissionSet.add(permission);
            }
        }
        return Result.success(permissionSet);
    }
}
UserController
以下获取name和pw的方法可根据自身情况选择,(感觉Java11注释掉的代码有问题)
 User res = userMapper.selectOne(Wrappers.<User>lambdaQuery()
                .eq(User::getUsername, userParam.getUsername())
                .eq(User::getPassword, userParam.getPassword()));
        // QueryWrapper<User> queryWrapper = new QueryWrapper<>();
        // queryWrapper.eq("username", userParam.getUsername());
        // queryWrapper.eq("password", userParam.getPassword());
        // User res = userMapper.selectOne(queryWrapper);
将数据HashSet按索引Id进行排序
		// 对资源根据id进行排序
        LinkedHashSet<Permission> sortedSet = permissionSet.stream().sorted(Comparator.comparing(Permission::getId)).collect(Collectors.toCollection(LinkedHashSet::new));

        //设置当前用户的资源信息
        res.setPermissions(sortedSet);
Permission实体类添加以下属性
private String icon;
PermissionMapper 新增查询用户权限ID,目录索引ID接口
	@Delete("delete from role_permission where role_id = #{role_id}")
    void deletePermissionsByRoleId(Integer role_id);

    @Insert("insert into role_permission(role_id, permission_id) values(#{roleId}, #{permission_id})")
    void insertRoleAndPermission(@Param("role_id") Integer roleId, @Param("permission_id") Integer permission_id);
RBAC权限模型(二阶段)
请根据自身情况调整代码
新增RoleController权限接口
RoleController
import org.springframework.web.bind.annotation.*;

import javax.annotation.Resource;
import java.util.List;
import java.util.stream.Collectors;

@RestController
@RequestMapping("/role")
public class RoleController extends BaseController {

    @Resource
    RoleMapper RoleMapper;

    @Resource
    PermissionMapper permissionMapper;

    @PostMapping
    public Result<?> save(@RequestBody Role Role) {
        RoleMapper.insert(Role);
        return Result.success();
    }

    @PutMapping
    public Result<?> update(@RequestBody Role Role) {
        RoleMapper.updateById(Role);
        return Result.success();
    }

    // 改变权限接口
    @PutMapping("/changePermission")
    public Result<?> changePermission(@RequestBody Role role) {
        // 先根据角色id删除所有的角色跟权限的绑定关系
        permissionMapper.deletePermissionsByRoleId(role.getId());
        // 再新增 新的绑定关系
        for (Integer permissionId : role.getPermissions()) {
            permissionMapper.insertRoleAndPermission(role.getId(), permissionId);
        }

        // 判断当前登录的用户角色是否包含了当前操作行的角色id,如果包含,则返回true,需要重新登录。
        User user = getUser();
        List<UserRole> userRoles = RoleMapper.getUserRoleByUserId(user.getId());
        if (userRoles.stream().anyMatch(userRole -> userRole.getRole_id().equals(role.getId()))) {
            return Result.success(true);
        }
        //如果不包含,则返回false,不需要重新登录。
        return Result.success(false);
    }

    @DeleteMapping("/{id}")
    public Result<?> update(@PathVariable Long id) {
        RoleMapper.deleteById(id);
        return Result.success();
    }

    @GetMapping("/{id}")
    public Result<?> getById(@PathVariable Long id) {
        return Result.success(RoleMapper.selectById(id));
    }

    @GetMapping("/all")
    public Result<?> all() {
        return Result.success(RoleMapper.selectList(null));
    }

    @GetMapping
    public Result<?> findPage(@RequestParam(defaultValue = "1") Integer pageNum,
                              @RequestParam(defaultValue = "10") Integer pageSize,
                              @RequestParam(defaultValue = "") String search) {
        LambdaQueryWrapper<Role> wrapper = Wrappers.lambdaQuery();
        if (StrUtil.isNotBlank(search)) {
            wrapper.like(Role::getName, search);
        }
        Page<Role> RolePage = RoleMapper.selectPage(new Page<>(pageNum, pageSize), wrapper);
        List<Role> records = RolePage.getRecords();
        // 给角色设置绑定的权限id数组
        for (Role record : records) {
            Integer roleId = record.getId();
            List<Integer> permissions = permissionMapper.getRolePermissionByRoleId(roleId).stream().map(RolePermission::getPermission_id).collect(Collectors.toList());
            record.setPermissions(permissions);
        }
        return Result.success(RolePage);
    }
}
UserController
新增用户与权限绑定post接口
 // 改变权限接口
    @PutMapping("/changeRole")
    public Result<?> changeRole(@RequestBody User user) {
        // 先根据角色id删除所有的角色跟权限的绑定关系
        roleMapper.deleteRoleByUserId(user.getId());
        // 再新增 新的绑定关系
        for (Integer roleId : user.getRoles()) {
            roleMapper.insertUserRole(user.getId(), roleId);
        }

        // 获取当前登录用户的角色id列表
        User currentUser = getUser();
        // 如果当前登录用户的角色列表包含需要修改的角色id,那么就重新登录
        if (user.getId().equals(currentUser.getId())) {
            return Result.success(true);
        }
        //如果不包含,则返回false,不需要重新登录。
        return Result.success(false);
    }


	@GetMapping
    public Result findPage(@RequestParam(defaultValue = "1") Integer pageNum,
                           @RequestParam(defaultValue = "10") Integer pageSize,
                           @RequestParam(defaultValue = "") String search){
+        LambdaQueryWrapper<User> wrapper = Wrappers.<User>lambdaQuery().orderByAsc(User::getId);
        if(StrUtil.isNotBlank(search)){
            wrapper.like(User::getUsername,search);
        }
        Page<User> userPage = userMapper.findPage(new Page<>(pageNum, pageSize), search);
+        // 设置用户的角色id列表
+        for (User record : userPage.getRecords()) {
+            List<UserRole> roles = roleMapper.getUserRoleByUserId(record.getId());
+            List<Integer> roleIds = roles.stream().map(UserRole::getRole_id).collect(Collectors.toList());
+            record.setRoles(roleIds);
+        }
        return Result.success(userPage);
修改PermissionController 中原接口方法,增加与之对应的用户及权限
@RestController
@RequestMapping("/permission")
public class PermissionController extends BaseController {

    @Resource
    PermissionMapper PermissionMapper;

    @PostMapping
    public Result<?> save(@RequestBody Permission Permission) {
        PermissionMapper.insert(Permission);
        return Result.success();
    }

    @PutMapping
    public Result<?> update(@RequestBody Permission Permission) {
        PermissionMapper.updateById(Permission);
        return Result.success();
    }

    @DeleteMapping("/{id}")
    public Result<?> update(@PathVariable Long id) {
        PermissionMapper.deleteById(id);
        return Result.success();
    }

    @GetMapping("/{id}")
    public Result<?> getById(@PathVariable Long id) {
        return Result.success(PermissionMapper.selectById(id));
    }

    @GetMapping("/all")
    public Result<?> all() {
        return Result.success(PermissionMapper.selectList(null));
    }

    @GetMapping
    public Result<?> findPage(@RequestParam(defaultValue = "1") Integer pageNum,
                              @RequestParam(defaultValue = "10") Integer pageSize,
                              @RequestParam(defaultValue = "") String search) {
        LambdaQueryWrapper<Permission> wrapper = Wrappers.lambdaQuery();
        if (StrUtil.isNotBlank(search)) {
            wrapper.like(Permission::getName, search);
        }
        Page<Permission> PermissionPage = PermissionMapper.selectPage(new Page<>(pageNum, pageSize), wrapper);
        return Result.success(PermissionPage);
    }
}
实体类对应属性
Role
	@TableField(exist = false)
    private List<Integer> permissions;
User
	@TableField(exist = false)
    private List<Integer> roles;
Mapper
RoleMapper
	@Delete("delete from user_role where user_id = #{user_id}")
    void deleteRoleByUserId(Integer user_id);

    @Insert("insert into user_role(user_id, role_id) values(#{user_id}, #{role_id})")
    void insertUserRole(Integer user_id, Integer role_id);
如发现代码无误报错,请仔细检查数据库对应属性,及驼峰命名
部署项目
部署环境需要
Linux系统:推荐Centos7或Debian9/10
软件环境
- JDK 1.8
- MySQL 5.7
- Nginx
前端
public文件夹中新建文件夹为static,并新创文件config.js内容如下
window.server = {
    filesUploadUrl: "localhost"
}
该配置文件用于存放前端环境变量
同时我们将Book页面中新增filesUploadUrl常量负责拼接配置文件中对应的ip地址
 data() {
    return {
      user: {},
      form: {},
      dialogVisible: false,
      search: '',
      currentPage: 1,
      pageSize: 10,
      total: 0,
      tableData: [],
      filesUploadUrl: "http://" + window.server.filesUploadSuccess + ":9090/files/upload"
    }
  },
以上配置在导入自己环境中进行报错,没有找到解决方案
报错为找不到filesUploadUrl
打包前端
npm run build
这是项目会生成一个list文件夹
我们直接将list上传到服务器
后端
我们需要新创建一个properties文件application-prod.properties并在application.properties中加入以下参数
#服务器ip,文件上传返回指定url
file.ip=[you servicecloud IP]

spring.profiles.active=prod
application-prod.properties文件如下
spring.datasource.url=jdbc:mysql://[you servicecloud IP]:3306/springboot-vue?useUnicode=true&characterEncoding=utf-8&allowMultiQueries=true&useSSL=false&serverTimezone=GMT%2b8
spring.datasource.username=root
spring.datasource.password=[[you servicecloud MySQL Pw]

file.ip=[you servicecloud IP]

#spring.jackson.date-format=yyyy-MM-dd
为了防止我们写的后端代码将地址绑定造成的不便,我们在文件控制类加入
 @Value("[you servicecloud IP]")
    private String ip;
并在其上传方法进行引用
 @PostMapping("/upload")
    public Result<?> upload(@RequestPart("file") MultipartFile file) throws IOException {
        String originalFilename = file.getOriginalFilename();  // 获取源文件的名称
        // 定义文件的唯一标识(前缀)
        String flag = IdUtil.fastSimpleUUID();
        String rootFilePath = System.getProperty("user.dir") + "/src/main/resources/files/" + flag + "_" + originalFilename;  // 获取上传的路径
        FileUtil.writeBytes(file.getBytes(), rootFilePath);  // 把文件写入到上传的路径


        return Result.success("http://" + ip + ":" + port + "/files/" + flag);  // 返回结果 url


    }

    @PostMapping("/editor/upload")
    public JSON editorUpload(@RequestPart("file") MultipartFile file) throws IOException {
        String originalFilename = file.getOriginalFilename();  // 获取源文件的名称
        // 定义文件的唯一标识(前缀)
        String flag = IdUtil.fastSimpleUUID();
        String rootFilePath = System.getProperty("user.dir") + "/files/" + flag + "_" + originalFilename;  // 获取上传的路径
        FileUtil.writeBytes(file.getBytes(), rootFilePath);  // 把文件写入到上传的路径


        String url = ip + ":" + port + "/files/" + flag;  // 返回结果 url


        JSONObject json = new JSONObject();
        json.set("errno", 0);
        JSONArray arr = new JSONArray();
        JSONObject data = new JSONObject();
        arr.add(data);
        data.set("url", url);
        json.set("data", arr);

        return json;  // 返回结果 url
    }
然后我们使用Maven将项目打Jar包,并上传到服务器
使用命令启动jar包
nohup java -jar [project-jar] --[startup parameter] &
由于本次部署没有使用分布式部署,故我没有匹配参数视频里默认指定为spring.profiles.active=prod,即使用prod.properties来进行服务端部署
查看部署日志
tail nohup.out
tailf nohup.out
配置Nginx
#SpringBoot-Vue-Project部署
server{
    listen          10000;
    server_name     localhost;

    charset utf-8;

    location / {
            root    /root/springboot-vue-project/vue/dist;
            index   index.html;
            try_files       $uri    $uri/   /index.html;
   }
}
由于本人的服务器80端口已占用,故我使用的是10000端口
当然各位跟着视频敲的话通用前缀会有一个api
我们可以在location / 后面加一个 location /api 里面指向的是后端服务器地址
当然我们不要忘了防火墙放行
至此
完结撒花!
本文档用时将近10天,为什么这么简单的项目看着视频敲10天才搞定呢?
当然我有以下几点原由
- 本人第一次开发前后端分离的项目,也是第一次开发这个比较大的项目,有很多知识瓶颈,及实践问题
- 知识体系及经验不足,出现了众多Bug,虽然该项目以前端为主,但自身对前端尤其是Vue框架的不熟悉导致,导致解决Bug的时间过长,效率变低
- 当然还是自身比较划水了,有时出现Bug焦头烂额,放弃治疗后,太过放松自身了
- 自身的开发效率比较低下
当然以上配置及文档有疏漏,切勿盲目cv
当然后续我还会为这个项目里增添一些属于自己的东西,持续更新!
暂时未实现功能
- 实现阿里云oss存储
学习知识
Resource和Autowired的区别
简单来说,这两的区别就是:
@Resource:
java的注解,属性较多,type无法分辨时可以用name分辨
@Autowired:
spring的注解,一个属性,type无法分辨时需要借助@Qualifier注解才能使用
使用@Autowired方式最好使用构造函数的方式注入。很简单的一个例子,有两个苹果,一个叫哈哈,一个叫呵呵,你指着两个苹果,意思是去拿个苹果,让@Resource去拿,如果不说明,他懵了,但是你说明拿叫哈哈的那个,他就知道了,给你拿来了,让@Autowired去拿,如果不说明,他也懵了,但是他又是个聋子,听不到你说的,结果就拿不到,但是如果写了个字条(@Qualifier)写明拿呵呵,他也就知道了。
什么是JWT为什么要用JWT
而JWT就是上述流程当中token的一种具体实现方式,其全称是JSON Web Token,官网地址:https://jwt.io/
通俗地说,JWT的本质就是一个字符串,它是将用户信息保存到一个Json字符串中,然后进行编码后得到一个JWT token,并且这个JWT token带有签名信息,接收后可以校验是否被篡改,所以可以用于在各方之间安全地将信息作为Json对象传输。JWT的认证流程如下:
原文:JWT详解
什么是WebSocket为什么需要 WebSocket
WebSocket协议是基于TCP的一种新的网络协议。它实现了浏览器与服务器全双工(full-duplex)通信——允许服务器主动发送信息给客户端。
我们已经有了 HTTP 协议,为什么还需要另一个协议?它能带来什么好处?
因为 HTTP 协议有一个缺陷:通信只能由客户端发起,HTTP 协议做不到服务器主动向客户端推送信息
原文:SpringBoot2.0集成WebSocket,实现后台向前端推送信息
Java8HashSet排序方法
再次重温Set不连续的特点
- HashSet不保证其元素的任何顺序。如果您需要此保证,请考虑使用TreeSet来保存元素。
Set<?> yourHashSet = new HashSet<>();
List<?> sortedList = new ArrayList<>(yourHashSet);
Collections.sort(sortedList);
- 将所有对象添加到TreeSet,您将获得一个有序集。以下是一个原始示例
HashSet myHashSet = new HashSet();
myHashSet.add(1);
myHashSet.add(23);
myHashSet.add(45);
myHashSet.add(12);

TreeSet myTreeSet = new TreeSet();
myTreeSet.addAll(myHashSet);
System.out.println(myTreeSet); // Prints [1, 12, 23, 45]
- Java 8的排序方式是
fooHashSet.stream()
  .sorted(Comparator.comparing(Foo::getSize)) //comparator - how you want to sort it
  .collect(Collectors.toList()); //collector - what you want to collect it to
- 使用Java 8收集器和TreeSet
list.stream().collect(Collectors.toCollection(TreeSet::new))
Bcrypt加密
Bcrypt是单向Hash加密算法,类似Pbkdf2算法 不可反向破解生成明文。
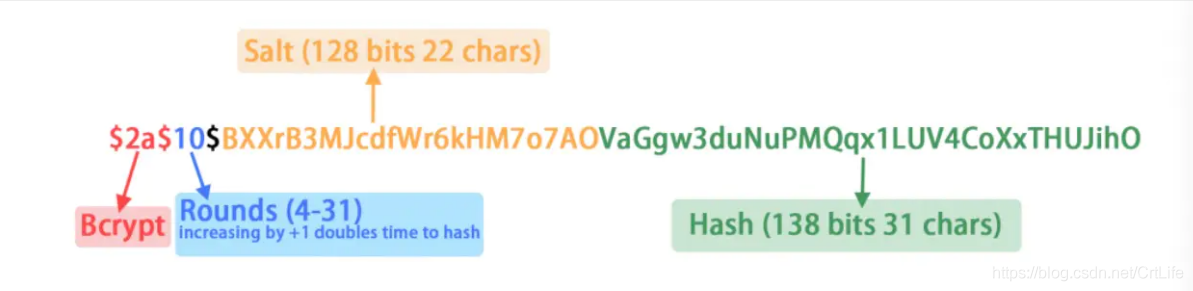
Q.E.D.